In order for your Android phone to connect to wireless networks you will need to turn on the Wi-Fi radio and connect to the wireless network of your choice.
Unless the wireless network is open, that is, it has no password. You will need to specify which wireless network to connect to and enter your credentials.
In this guide I will show you how to connect to a wireless network on your Android phone.
Software/Hardware used: Nexus One running Android 2.3.4.
1. Press the Menu button on your phone while on the Home screen.

2. Tap Settings when the menu appears.
3. Tap Wireless & networks from the Settings page.

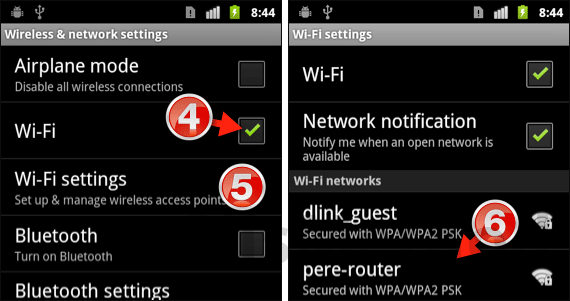
4. Tap the Wi-Fi checkbox to enable the Wi-Fi radio.
5. Tap Wi-Fi Settings to connect to a wireless network.
6. Tap the wireless network you wish to connect to.
Note: If the wireless network is secured you will need to provide a password to connect.

7. Enter the password for the wireless network you are connected to and tap Connect.
A. Once you are connected to the wireless network the status will change to Connected to “router name”.
If you have any comments or questions please use the comments form below.


