Since we began our first guide using the Start menu to access the Shut down, Log off, and other commands, it’s only right that we continue to explore the Start menu, how it works and what it can do for you.
The following is part of a series of articles that will mirror an electronic book that I’m set to release in December of this year. The eBook’s main focus will be helping new and old Windows users become familiar with the new version of Windows 7 that will available to the public in December. I hope that you find this series useful and informative and that you enjoy it so much that you will purchase my eBook when it is released.
This article is part of Chapter 1 of Windows 7 Basics How-to Guides for the Rest of Us™. To access other how-to’s from the book head on over to the Books section of this site.
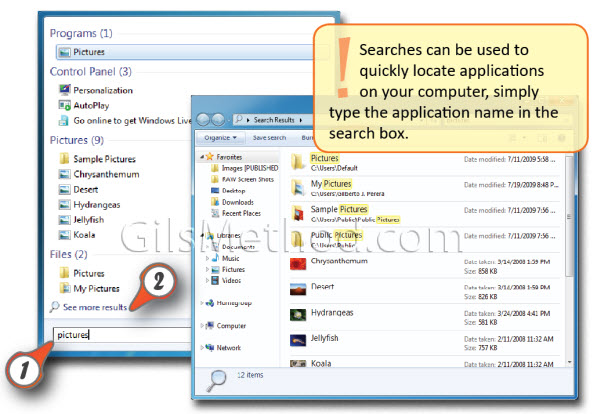
Aside from providing you with easy access to your Documents, Computer, Control Panel, and other areas in your computer. The Start Menu provides you with a simple way to search for any files and folders located in your computer. The best part about this search feature is that the built-in search function automatically indexes the location of all your files and folders. This means that search results are displayed instantly, within the Start Menu itself.
Alternately you can click on the See more results link (explained below) to view the entire list of items matching your search terms. The simple two step guide below will show you how to use this simple yet powerful tool to quickly locate files and folders in your computer. Advanced search features will be covered in future chapters, so subscribe to Gil’s Method to make sure you don’t miss them.

1. With the Start Menu open, type the search query into search box…The Start Menu will switch to display results of your query (results will be grouped by type; Programs, Pictures, Files, etc.)
2. Click on the See more results link to view the results in a separate window which will enable sorting, saving of searches, etc.


