Are you looking for a way to quickly resize an image or group of images without having to open a photo editing application? How about being able to resize an image by right-clicking any image and selecting the desired size? With Image Resizer for Windows you can. We’ve covered the image resizer app before, but it was a PowerToy for Windows XP which didn’t work on Windows 7. In this guide I will show you how to use the new and improved resizer that is compatible with Windows Vista and 7 (32-bit and 64-bit). Check out the guide below that will show you how to resize images with this powerful and free tool.
If you have any comments or questions please use the comments form at the end of the article.
Software used: Image Resizer 2.1.1 running on Windows 7 Ultimate 64-Bit.
How to Resize Images with Image Resizer
Make sure you download (link at the end of the article) and install the application before proceeding.

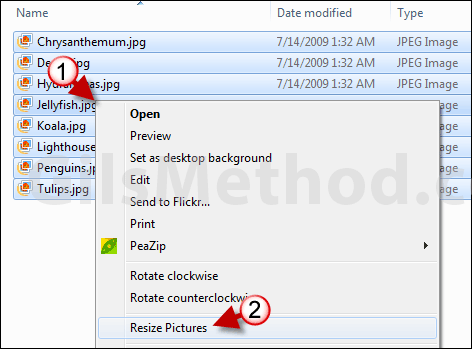
1. Select an image or group of images and right-click to open the menu.
2. Click on Resize Pictures.

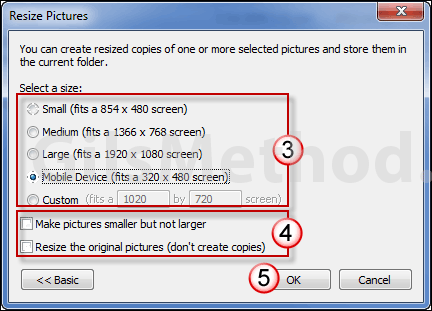
3. The Resize Pictures window will open. Select the size you wish to resize the images to (use the preset or enter a Custom value).
Note: If you enter Custom values the application does not constrain proportions so make sure you get the resize ratios correct.
4. If you click on the Advanced button you will be able to select the following options:
- Make pictures smaller but not larger.
- Resize the original pictures (don’t create copies). Warning: If you choose this option the original images will be overwritten!
5. When you are ready to resize the images click OK.

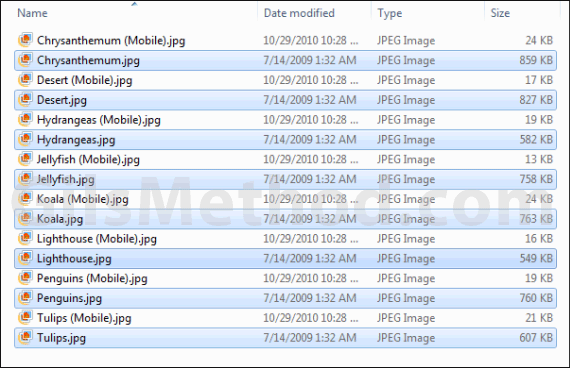
The resized images will appear along with the originals (if you chose to keep originals). Note that the resized images will use the name of the original image and the preset you used to resize the image.
Download Image Resizer (direct download links) 32-bit or 64-bit.


