Your microphone is ready and you’ve trained Windows 7 to understand your speech, now what? You can start dictating or you can simplify dictation and speaking commands by using one of the tables that contain common commands when using speech recognition. These commands are what really allow you to give up a mouse and keyboard because you can navigate Windows by using your voice. The guide below will show you how to access the commands list, how to print them for easy access and provide you with a PDF file that you can print of Common Speech Recognition commands. If you have any comments or questions please use the comments form at the end of the article.
Software/Hardware Used: Windows 7 Ultimate.
Are you trying to configure your microphone to work with speech recognition? Make sure to check out How to Setup Your Microphone for Speech Recognition in Windows 7. Once you’ve added the microphone you might want to train Windows 7 to understand you.
Locate and Print the Speech Reference Card
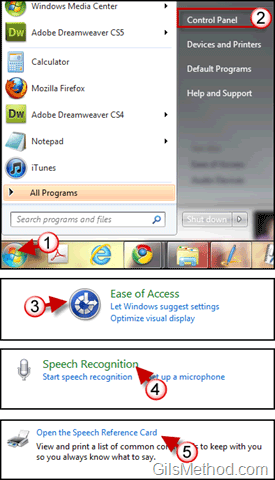
1. Click on the Orb to open the Start Menu.
2. Click on Control Panel.
3. Click on the Ease of Access Control Panel item.
4. Click on Speech Recognition.
5. When the Speech Recognition window opens click on Open the Speech Reference Card.
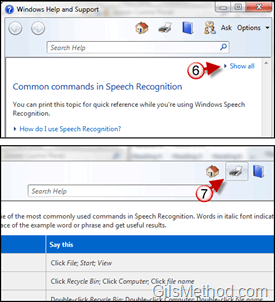
6. When the Windows Help and Support window opens, click on the Show all link. Alternately you can browse each of the commands tables individually by clicking on the appropriate link.
Command tables available:
- Common Speech Recognition commands
- Dictation
- Keyboard keys
- Punctuation marks and special characters
- Controls
- Windows
- Click anywhere on the screen
7. Once you’ve located the table you wish to print simply select it and click the Print button. I don’t recommend printing the entire list because you will end up with a book rather than a short command list.
I’ve included a PDF of Common Speech Recognition Commands. Click on the image below to download the PDF file.


