In order to install WordPress, Joomla, Drupal or any other dynamic content management system (CMS) you must first have a couple of things ready.
First, you need a web host that will host your files on the web, second you will need a domain name (www.yoursite.com) and third you will need a MySQL database.
This guide is focused on the third step, setting up a MySQL database for your site with 1&1 hosting.
Note: 1&1 Dedicated Managed Hosting was used for the screenshots below, but instructions should apply to virtual and shared hosting using 1&1’s control panel.
Setup MySQL Database in 1&1 Hosting
The guide below assumes that you already have a hosting package and have administrative privileges.

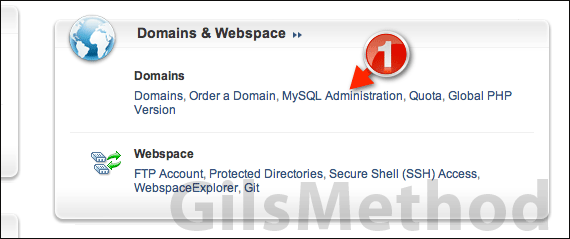
1. After you sign-in to the 1&1 Control Panel, click on MySQL Administration in the Domains & Webspace box.

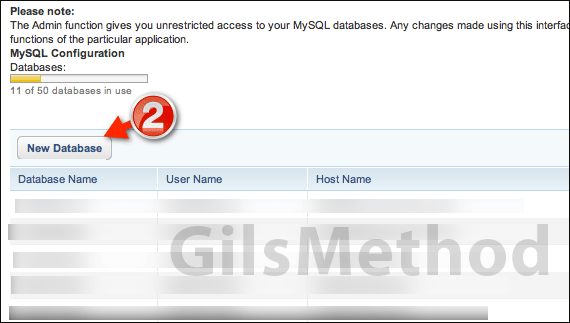
2. A listing of all the MySQL database should appear. If you don’t have any databases in your account, the list will be empty.
Click on the New Database button to create your first database.
Note from 1&1:
- It is not recommended that MySQL databases be used for log evaluation operations, ad clicks, chat systems, banner rotations, or similar applications. This will create a load on the server which will greatly inhibit the ability for backups of your data to be created as well as possibly cripple your server.
- Your MySQL databases are stored behind a firewall to protect your data. You can only access each one exclusively through your server. Direct access to your MySQL databases using a home PC (external ODBC connection) cannot be established.
- For Managed Server packages, there is no quota on storage space. This means that the storage space available for your MySQL database depends on the size of your hard disk space.
The Admin function gives you unrestricted access to your MySQL databases. Any changes made using this interface cannot be rolled back. Deleting entries in forum (ex. phpBB), guest book or similar applications should only be made using the administrative functions of the particular application.
Databases created will run MySQL version 5, version 4 is no longer supported.
Name the Database

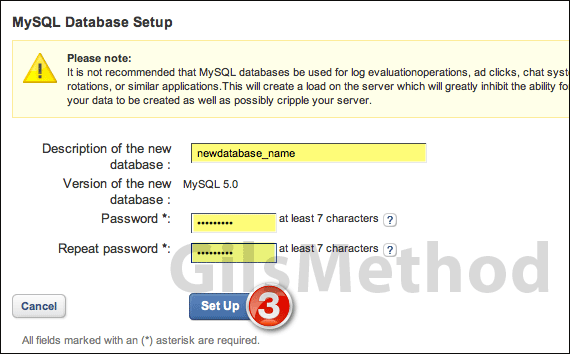
Enter a description and passwords for the new database. Make sure to include the website/application the database will be used for.
Also make sure to use a complex password to protect the database.
3. When you are ready, click Set Up to begin the database setup process.

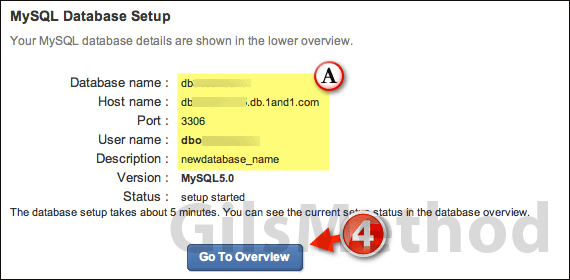
A. Write down or copy the database information in a safe place.
4. Click on Overview to see the status of the database.
Databases usually take a couple of minutes to be ready. Once the database is in the Ready status you will be able to use it with the CMS that requires it.
If you have any comments or questions please use the comments below.


