If you are having trouble sending a PDF via email because the file is too large or you’re looking to save some space on your hard drive, you may want to look into PDF compression.
Although there are several tools out there that will compress PDF files you may want to take a look at Acrobat, especially if you are using it to create your PDF files.
Acrobat has a built-in option that allows you to compress PDF files so that you can save space and reduce the likelihood that an email will bounce because the attachment is too large.
Follow the instructions below to learn how to compress PDF files with Acrobat.
Software/Hardware used: Acrobat X running on Mac OS 10.6.

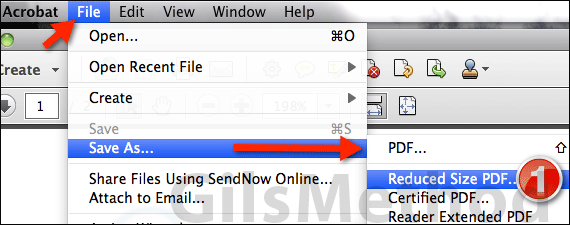
1. Click File on the Menu bar, then Save As… and click Reduced Size PDF… from the menu that appears.
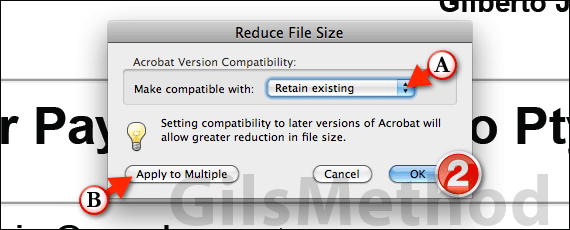
The Reduce File Size window appears.

A. Choose which versions of Acrobat the new PDF file will be compatible with from the list.
For maximum compatibility you may want to choose an earlier Acrobat version like 6 or 7 which will ensure a lot of users will be able to view the PDF file.
However, when you use older versions of Acrobat, file reduction is limited so keep that in mind.
B. You can also reduce multiple PDF files by clicking the Apply to Multiple button. However if you only wish to reduce the opened PDF file proceed to step number two.
2. Click OK to save the PDF file in a reduced size.

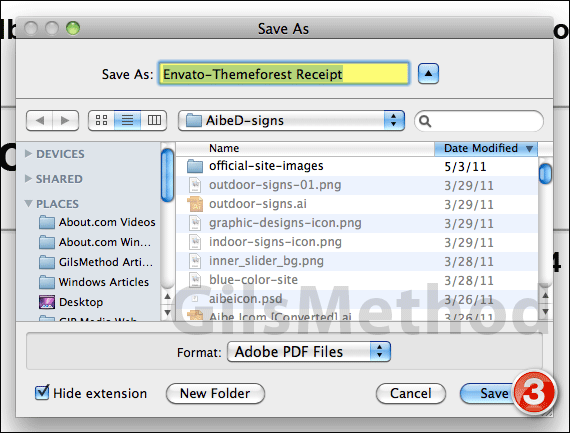
3. You will be prompted to name and choose a location for the reduced PDF file. Once you’ve chosen a save location and named the file click Save.
Saving the file may take between a couple of seconds to a couple of minutes, depending on the size of the PDF and your computer’s specifications.
The PDF file used for this guide was reduced from 127KB to about 70KB. You should see similar results when you compress your PDF files.
If you have any comments or questions please post them below.


