Have you spent hours tagging your family and friends with Picasa’s face recognition feature? I know I have, with over 20,000 pictures I would be very unhappy if I lost that information, so if you’re looking to safeguard all of that valuable time and information you may want to follow the steps below.
When I backup my pictures, am I not also backing up the database? No, when you backup your photos using Picasa, you are just backing up the actual images themselves, not Picasa’s database which contains all of the information (Geotags, name tags, and other information).
Software/Hardware used: Picasa 3.8 running on Mac OS.

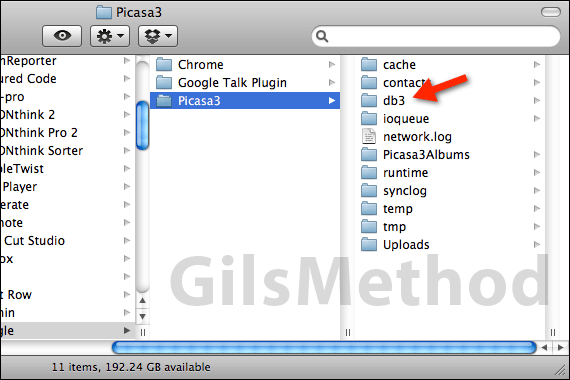
1. On your Mac, open Finder and browse to the following location.
Your User Name > Library > Application Support > Google > Picasa3
In the Picasa3 folder you will find several files, the one we are interested in is the db3 directory which contains Picasa’s database.

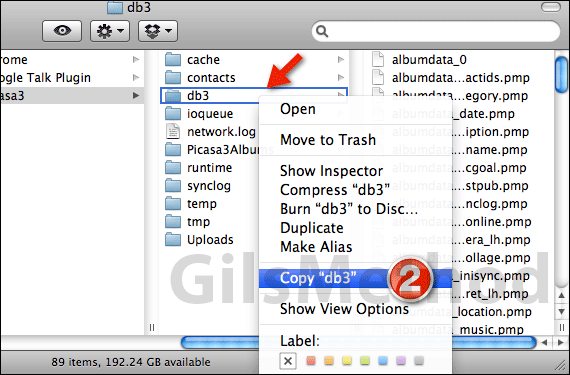
2. Right-click the db3 folder and click Copy “db3” from the menu.
Note: Before copying the db3 directory you may want to click Get Info when you right click on the folder to see how large the folder is. In my case the database directory is over 1GB, so make sure that the device you copy the folder to can handle the space required.
3. Open an external or secondary hard drive and paste the db3 folder in a location you can access at a later time. You have successfully create a backup copy of your Picasa database.
If you ever need to recover the backup, first install Picasa and run it for the first time. When it’s done loading, close the application and open the directory referenced in Step 1 above. Copy and overwrite the db3 folder on your Mac with the backup copy you made. When the files are done copying over, run Picasa and all of your pictures, tags, geotags, and other information will be there.
Note: It is important that the directory where the pictures were originally stored remain the same for this to work.
I will be covering these same steps for Picasa users on Windows, so stay tuned. If you have any comments or questions please use the comments form below.


