In previous articles I’ve shown you how to back up your Mac with Time Machine and Super Duper, two fantastic approaches to safeguarding files from your Mac.
In this guide I will show you yet another application that will enable you to keep your files secured on external hard drives and network locations.
Carbon Copy Cloner or CCC is a free Mac application that allows you to quickly and securely backup your Mac to one of several storage options.
On this guide I will show you how to backup your Mac to an external hard drive using CCC.
To get started with Carbon Copy Cloner (CCC), first download (link at the end of the guide) the application from the publisher’s website and install.
How to Back Up Your Mac with CCC
1. Once installed, launch the CCC application and review the license agreement. Click Agree to continue using the application.
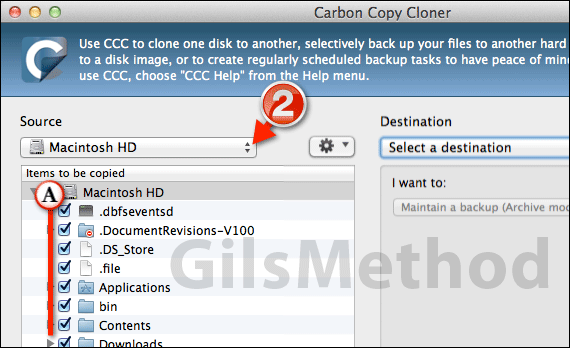
2. Select the Source drive…
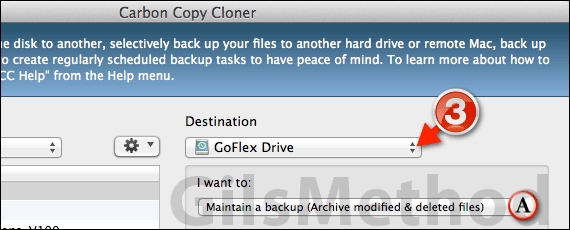
3. Select the Destination drive…
When you select the destination drive you will have to select one of two backup options from the I want to: drop-down menu.
Option 1 – Maintain a backup (Archive modified & deleted files):
- Files and folders on “destination drive” that are not present on “source drive” will be archived.
- Previously backed up files on “destination drive” will be updated only if the size or modification date differs.
- Older versions of updated files will be archived.
- CCC will prune archive content until 5GB of free space is available on the “destination drive”.
Option 2 – Maintain a backup (No archiving):
- Files and folders on “destination drive: that are not present on “source drive” will be deleted from “destination drive”. Files and fodlers at the root level of “destination drive” will not be modified or deleted if they do not exist in “source drive”.
- Previously backed up files on “destination drive” will be updated only if the size or modification date differs.
- Older versions of updated files will not be archived.
Note: You can also customize the backup’s behavior by clicking the Customize these settings button. However, for the sake of simplicity we will ommit this from the guide.
When you are ready click Schedule this task.
4. Schedule Tab
I recommend you schedule backups on a daily basis to ensure that you have a fresh backup of your data.
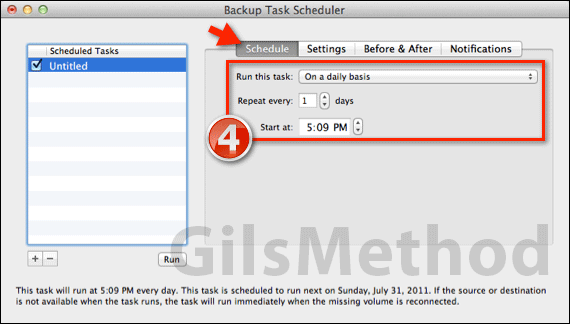
On the Schedule tab you will be able to set the schedule for automatic backups. Select one of the frequencies from the drop-down menu and how often in days.
You can also set the time for the backup. I recommend setting this to time periods when you are not on your Mac.
5. Settings Tab
On the Settings tab you can specify certain options that will ensure your backups run smoothly.

The default settings are recommended because they ensure that the correct hard drive is used for backups and that you are notified when the backup is complete.
Additionally you can have the application skip notifications when the backup volume is not available.
Note: I strongly urge against this becuase the idea is to backup and if the computer doesn’t tell you that it has no access to the backup volume you’re back on square one.
6. Before & After Tab
This page provides you with settings that allow you run scripts before and after the backup.
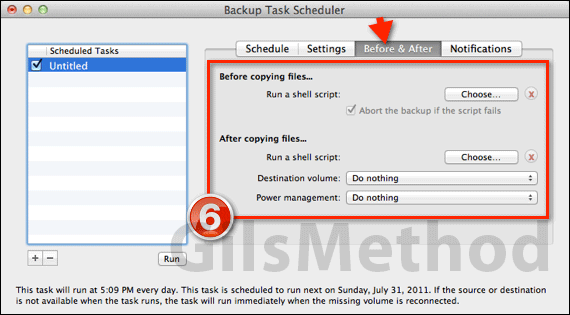
You can also specify power management settings specific to the completion of a backup and what the computer does with the drive once the backup is complete.
7. Notifications Tab
Carbon Copy Cloner has a built-in notification system that can email you or others about the status of the backup.
This is a great way of making sure that backups are occuring when they are supposed to.
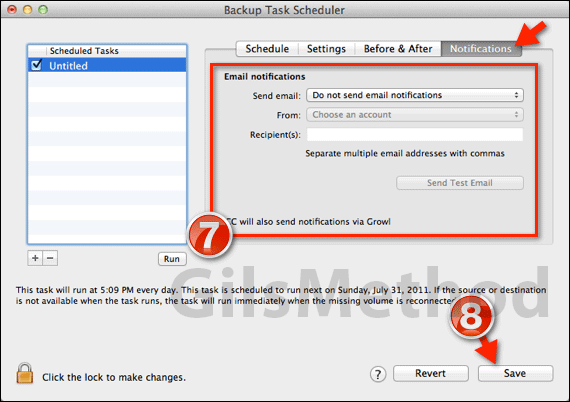
The email notificaitons are in addition to the Growl notifications you see on the desktop.
8. When you are ready to save the changes, click Save.
If you have any comments or questions please use the comments form below.
Download the application from Bombich Software.
System Requirements
- Intel or PowerPC Mac
- Mac OS 10.4 (Tiger) – OS 10.7 (Lion)
Software/Hardware used: Mac OS X Lion and Carbon Copy Cloner 3.4.1.


