Since we began our first guide using the Start menu to access the Shut down, Log off, and other commands, it’s only right that we continue to explore the Start menu, how it works and what it can do for you.
The following is part of a series of articles that will mirror an electronic book that I’m set to release in December of this year. The eBook’s main focus will be helping new and old Windows users become familiar with the new version of Windows 7 that will available to the public in December. I hope that you find this series useful and informative and that you enjoy it so much that you will purchase my eBook when it is released.
This article is part of Chapter 1 of Windows 7 Basics How-to Guides for the Rest of Us™. To access other how-to’s from the book head on over to the Books section of this site.
The Start menu is the gateway to your computer, it provides you with access to the applications installed on your computer, the files saved on storage media, be it a hard disk, CD-ROM/DVD-ROM drive, thumb drives, and others, most importantly the Start menu provides you with access to the Control Panel and other administrative tools. The Start menu allows provides the following activities:
- You can start applications
- Open commonly used folders
- Search your computer
- Access help for your computer
- Access settings for your computer
- Shut down, log off, switch accounts, and place computer in Sleep mode
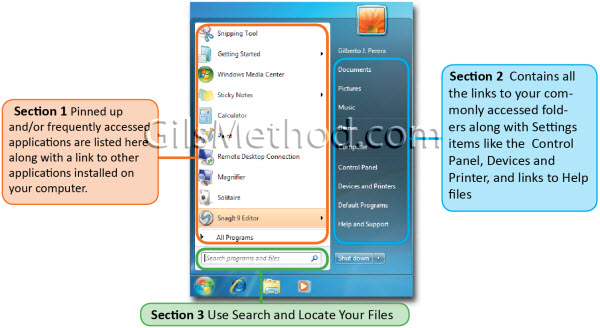
The Windows Start menu is comprised of three distinct sections, all providing you with easy access your files, applications, and settings.
- Section 1 – on the left contains the most frequently accessed applications with an option view all installed programs by clicking on the All Programs link.
- Section 2 – is made up of links to commonly used folders, files, settings, and other features.
- Section 3 – is the built-in search feature that allows you to locate any file or program on your computer within seconds.
