In a recent acquisition, Google bought online photo editing company Picnik. With this acquisition Google has been quickly incorporating Picnik’s cool photo editing features in Picasa Web Albums and just this past week to the latest version of Picasa. In Picasa 3.8 you will be able to edit photos using Picnik’s online tools within the Picasa window, there will be no need to use a browser to access all of these photo editing tools.
If you’re a Picnik fan you are going to love this integration, however if you are new to Picnik you definately need to check it out. The guide below will show how to use the new Picnik editing tool in Picasa 3.8.
Note: I used Picasa 3.8 for this guide.
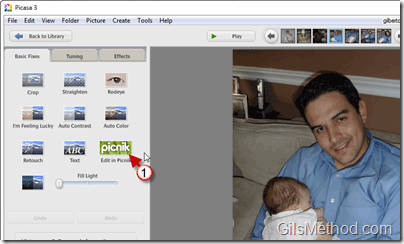
1. When you open a single image in Picasa (to edit the image) you will notice that in the Basic Fixes tab a new button is available. To edit your picture with Picnik, click on the Picnik button.
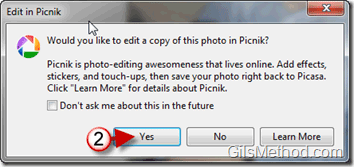
2. When the Edit in Picnik confirmation window opens, click on Yes to proceed with editing the image.
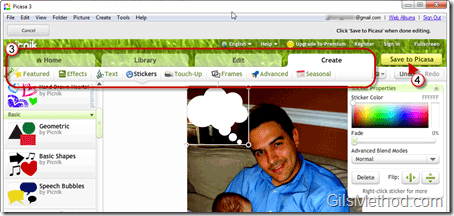
Picnik will load within the Picasa window so there will be no need to use the browser.
3. Use the tools in Picnik to touch-up your photos, add effects, and do what you would like.
4. When you are done editing the photo you can Save to Picasa so that the edited image is saved to your computer.
5. You will have the option to Replace the photo you edited or to Save a new copy to Picasa.
When you return to Picasa you will find the image you edited using Picnik’s photo editing tools online within your Picasa application window. Pretty cool, huh?


