Although Word’s AutoCorrect feature makes us a bit careless with what we type, it does heck of a job to increase our productivity. It corrects typos, capitalizes words for us, and makes sure that we capitalize the correct words. It also does a great job of being really annoying at times because it will automatically capitalize words you don’t want capitalized or correct words it thinks should be one thing when you meant another, don’t get me wrong it is pretty darn accurate, but if you want to the option to shut it off or want to add a couple of exceptions to the list, you’ll find the instructions below useful.
If you need help with this feature or have questions, please use the comments form below.
Note: I used Word 2010 for this tutorial, but it should apply to Word 2007.
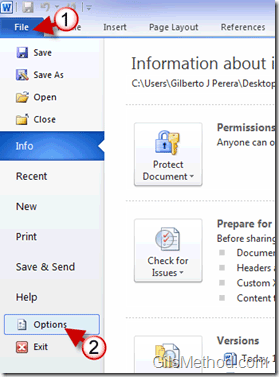
1. Click on File to open the menu.
2. Click on Options.
3. When the Word Options window opens, click on Proofing on the left pane.
4. Click on the AutoCorrect Options button.
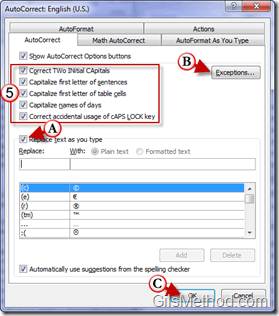
When the AutoCorrect <Language> window opens, you will have several options.
5. To control what items Word AutoCorrects, add or remove checkmarks to each of the items listed below:
- Correct TWo CApitals
- Capitalize first letter of sentences
- Capitalize first letter of table cells
- Capitalize names of days
- Correct accidental usage of cAPS LOCK key.
A. You can also specify whether or not you want Word to Replace text as you type. If so you can add items to the list or modify the existing list.
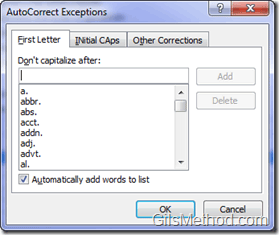
B. To specify Exceptions to all these rules, click on the Exceptions button (see screenshot below).
AutoCorrect Exceptions List.
C. When you are satisfied with the changes, click OK to save the changes and close the window.


