Not a fan of Computer-123 as your computer’s name? Don’t worry, with this guide we’ll fix that. Why should it matter what a computer is named, who cares? Nowadays with so many computers in a household it becomes necessary to use descriptive names in order to keep track of which computer is which. When you share files on the network or if you use a Windows Home Server to backup the computers on the network, identifying computers becomes a must. For example when you use Windows Home Server, the computers will be listed by the name assigned to them. If  you have 5 computers and they are all named Computer-123 or some variant of that – how would you identify them? One of the simplest methods to resolve this issue is to use a descriptive name for your computers.
The how-to below will show you where you can change the name and description for your computer. If you have any comments or questions, please post them below.
Note: I used Windows 7 Ultimate for this tutorial.
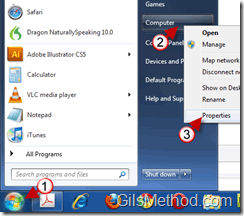
1. Click on the Windows Orb to open the Start Menu.
2. Right-click on Computer.
3. Click on Properties from the menu.
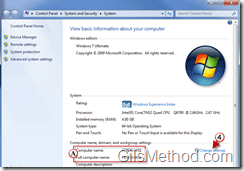
A. When the System window opens, note your computer’s current name next to Computer Name.
4. Click on the Change Settings link.
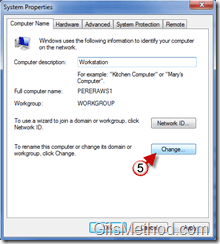
5. When the System Properties window opens, click on the Change button.
Note: In this window you can add a short description for your computer in the Computer description field.
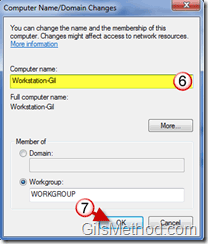
6. Enter the name you wish to use for the computer.
7. Click OK to save the settings.
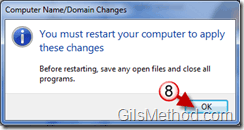
8. In order for the settings to be saved, your computer will need to be restarted, click OK again to continue.
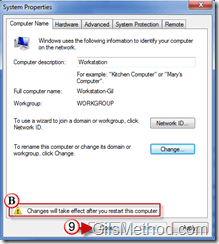
B. When you return to the System Properties window you will notice that there is a warning stating that: “Changes will take effect after you restart the computer.â€
9. Click Close to exit the System Properties window.
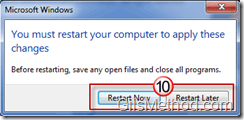
10. You will be prompted again to restart the computer. You can continue to work on your computer, but the new name will not be in effect until you restart or you can restart and not have to worry about restarting later.

