If you’re new to the iPad, chances are you are wondering how you’re going to get pictures stored on your computer to your new iPad.
The only way that you can copy pictures to your iPad is by using iTunes, emailing the pictures to yourself, or using a MobileMe-like service to keep your pictures synchronized.
The guide below will show you how to configure iTunes and your iPad to keep pictures stored on your computer synced with your iPad.
Software/Hardware used: iTunes 10 running on Mac OS X and an iPad running iOS 4.2. These instructions should apply to the iTunes version for Windows.
Before proceeding, please make sure that your iPad is plugged in to your computer.

1. Click on the iPad in iTunes under Devices.
2. Click the Photos tab.
3. Check Sync Photo’s from.
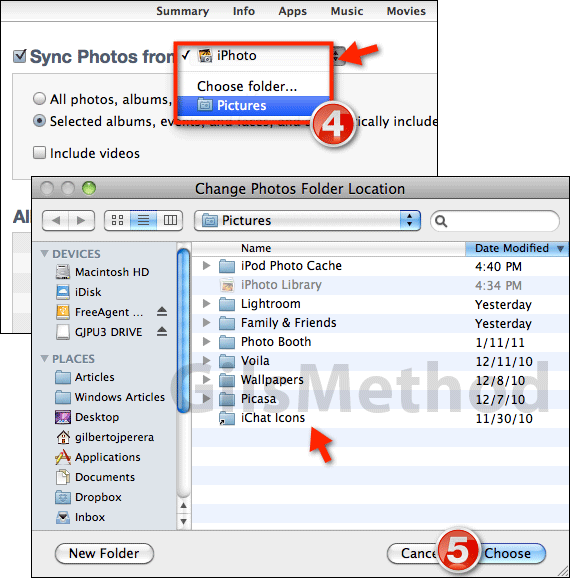
4. If you are running iTunes on a Mac and use iPhoto to manage your pictures, select iPhoto from the Sync Photos from drop-down.
Otherwise click Choose folder… to locate the directory containing the photos you wish to sync with your iPad.
Note: When you select the directory make sure to select the main directory containing all of your photos, this way you can select individual folders by following the steps below.
Using this method you can only sync one directory (that can contain multiple folders) at a time, this is why I recommend you use the directory containing all of your photos.
If your photos are dispersed across a network or several computers, I recommend that you combine the photos in one location to facilitate synchronization of photos to your iPad.
5. When the folder location window opens (same on Mac and Windows), find and select the folder containing the picture you wish to sync. Click Choose to continue.
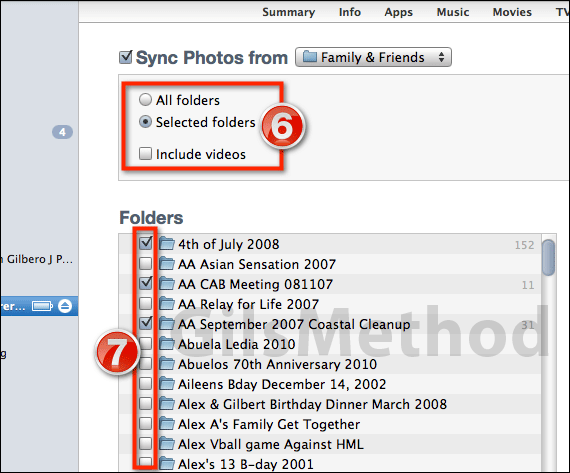
6. When you come back to iTunes you will notice that you have the option of syncing All folders or Selected folders within the directory you selected.
Note: When syncing photos to your iPad you can also opt to include videos that are contained in those folders, but be aware that adding videos will increase the length of the initial sync and will reduce the amount of space on your iPad.
7. If you choose to select individial folders, which I recommend, a separate list will appear with the names of all the folders contained in the selected directory. Check the folders you wish to include for the iPad.
Note: If the directory you selected exceeds the space of the iPad you will receive an error when syncing.
9. Click on Apply to save the settings and sync with your iPad.
If you encounter any issues or have any questions, please use the comments form below.


