If you’re in the mood to have some fun with your pictures this Halloween you are going to love the new Halloween Effects, stickers, and fonts available in Picnik. You have two options to access Picnik’s cool features; you can go to Picnik.com or you can use the latest version of Picasa to edit your pictures with Picnik. The how-to below will show you where these new effects reside and how to use them with Picnik. If you have any comments or questions please use the comments form at the end of the article.
Here are some of the features they have added:
- Halloween Effects — Tools are broken up by monster; zombie, vampire or other creature of the dark.
- Halloween Stickers — Stickers that allow you to add everything from witch hats, ghosts, and jack-o-lanterns to tombstones, fangs, lesions and bats.
- Halloween Fonts — Spooky fonts that allow you to write words in skeletons, ghosts or other scary looking text.
Software used: Picasa 3.8.
Use Picnik’s Halloween Effects in Picasa
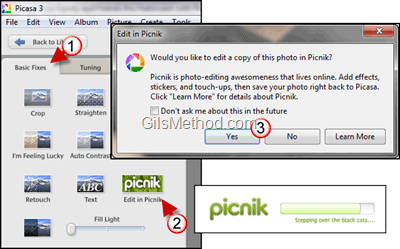
1. Open Picasa and double-click on a picture you wish to spookify. Click on the Basic Fixes tab.
2. Click on the Edit in Picnik button.
3. You will be asked if you would like to edit a copy of this photo. I always choose Yes, but it’s up to you.
Picnik will load in the Picasa application window…
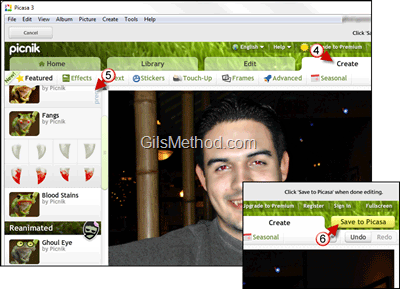
4. Click on the Create tab to open the effects menu.
5. Edit your photograph by using the effects listed on the left pane. Tools are divided by monster type, but you can combine vampire fangs with zombie eyes, it’s all up to you.
6. When you are ready to save your experiment, click on Save to Picasa to save the picture to your computer.
7. Share if you dare!
What other sites or applications do you use to modify your pictures? Please use the comments form below.


