Do you want to share a specific directory or file with your HomeGroup? By default Windows 7 shares the Documents, Pictures, Videos, and Music Libraries, but if you’re looking to share a specific directory on your computer with a HomeGroup you will have to do so manually. Follow the instructions below to learn how to share files and directories with your HomeGroup in Windows 7. If you have any comments or questions please use the comments form at the end of the article.
Note: In order to share files with a HomeGroup you need to have created a HomeGroup or joined a HomeGroup.
Software/Hardware used: Windows 7 Ultimate.
How to Share Files with Your HomeGroup
1. Locate the file or directory you wish to share with the HomeGroup.

2. Right click on the file or directory.
3. Click on Share with.
4. Click on HomeGroup (Read) or HomeGroup (Read/Write).
The difference between the two options is whether or not users from the HomeGroup can edit the files or not. To be safe you may want to use Read access and allow Read/Write for specific files that require it. With this menu you can also share files with specific people, but this is out of the scope of HomeGroup and will be covered in a future article.
Alternately you can use the menu bar in Explorer to share files and folders.
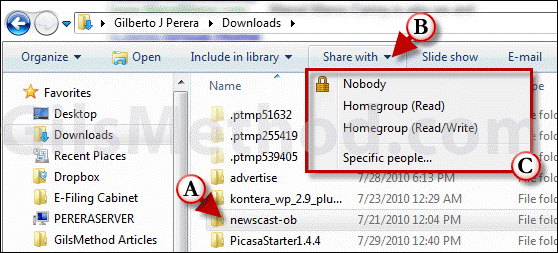
A. Click on the file or folder you wish to share.
B. Click on the Share with button in the menu bar.
C. Click on HomeGroup (Read) or HomeGroup (Read/Write).
In either scenario, Windows will ask you if you are sure that you want to share the selected items.

5. Click Yes, share the items to proceed.
If you wish to unshare a file or folder simply repeat the steps above and click on Nobody from the Share with list.
Now the HomeGroup or individuals you specified will have access to the files you just shared.
