
Although elementary as a security measure, disabling the routers ability to broadcast its SSID is still used by many and I feel it is an added layer that will keep snoopers away. If you have this feature enabled you will find that adding a network device requires additional steps that you may not be familiar with.
I recently upgraded my router and beefed up security quite a bit. One of the features I disabled was SSID broadcasting. Today I received a call from my wife that she could not find the wireless network from her work laptop and she needed to get online. I forgot to update her security settings so I had to sit with her on the phone and walk her through the process of adding a router that is not broadcasting its SSID and the new security settings. As I walked her through this I realized that perhaps others do not know how to add networks manually and so this article will walk you through the process.
What the heck is an SSID?
The SSID is your router’s name. SSID or Service Set Identifier is a user friendly name used to identify an 802.11 wireless LAN (local area network), your router.
By default most routers will broadcast their SSID which makes it easy for devices like laptops, mobile phones, PS3, and others to find your router. As an added level of protection routers can be set to disable broadcasting of the SSID which makes it more difficult for casual wireless snoopers to find your network, of course somebody who wants to gain access to your network will find this measure elementary and will discover your network immediately. This is why I encourage users to enable WPA2 security on their routers on top of other measures.
I hope you find it useful. If you have any comments or questions, feel free to post them below.
Note: I used Windows Vista Ultimate for this Tutorial

1. Click on the Orb (Windows Logo) > Control Panel
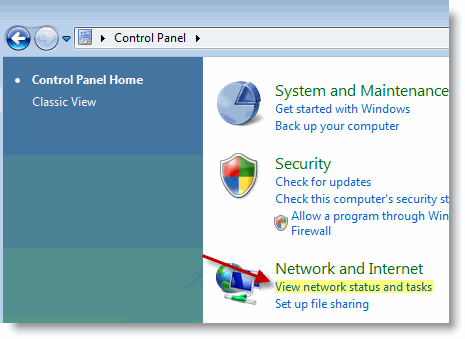
2. Click on the View network status and tasks link located under Network and Internet
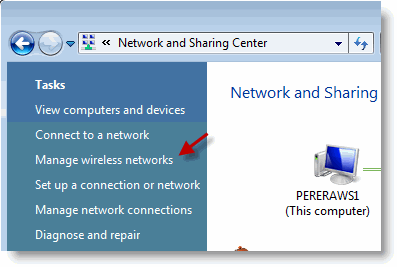
3. Click on the Manage wireless networks link
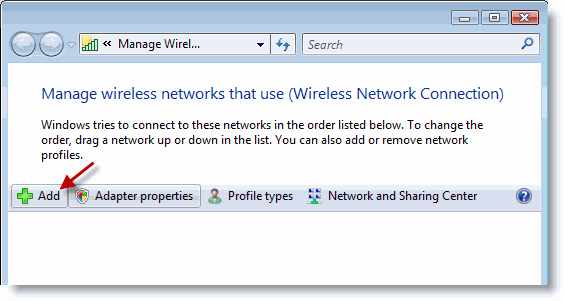
4. The Manage Wireless Networks window will open. To add a wireless network click on the Add button.
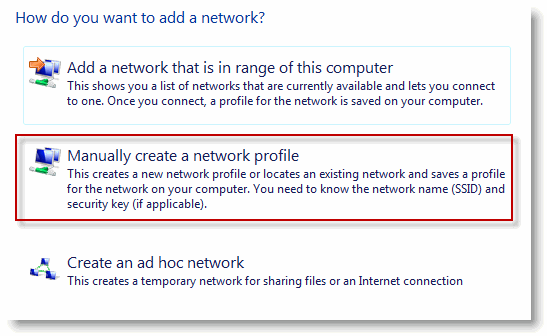
5. Choose Manually create a network profile
Configuration
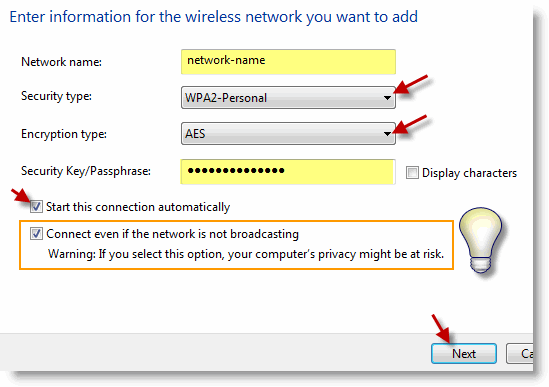
6. Enter the required information;
- Network name: This is the SSID or the name assigned to the router
- Security Type: Choose the security type used by the router – make sure to choose the right one otherwise you will not be able to connect to the router.
- Encryption Type: Once you choose the security type you need to determine the encryption being used. Like the Security type make sure you choose the correct one otherwise you will not be able to connect.
- Security Key/Passphrase: Enter the security key provided to you.
- Start this connection automatically: If this is a trusted source then you should enable this so that you don’t have to manually add it each time you wish to use the wireless network.
- IMPORTANT – In order to access a wireless router that is not broadcasting it’s SSID/Name (the whole reason behind this article) you must select Connect even if the network is not broadcasting.
To proceed, click Next when all information has been entered.
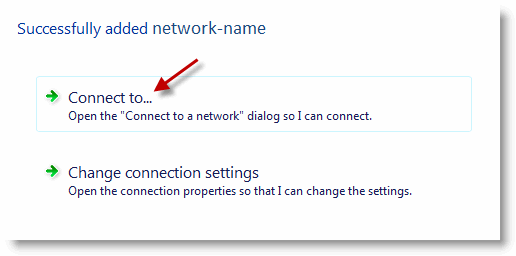
7. Click on Connect to…
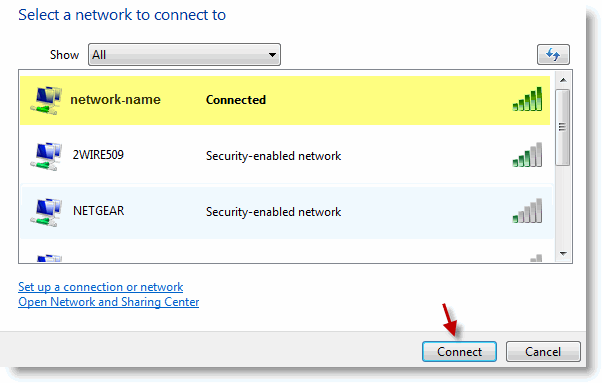
8. Select the network that you have just added (network-name) and click Connect.
Note: If you allow a couple of seconds before clicking Connect the computer may connect automatically as it did while I was writing the tutorial. If this happens to you and the status of the connection is Connected (to the router of your choice) then you can exit the window by clicking Cancel.


