 Most of the time I work with a lot of data and I’ve found that the most effective and simple way of sorting and making use of that data is by applying AutoFilters in Excel. The AutoFilter tool allows you to arrange a set of data in a variety of ways which helps you find specific information and sort the data in a more friendly matter. Every time you filter your list by selecting an item from the AutoFilter menu you get a count on the number of times that specific criteria you chose appears. Autofilter is one of the many tools available in Excel that allow you to make something out of data without having to comb through it. To learn how to use the AutoFilter tool in Excel please follow the instructions below. Any comments/suggestions are welcome.
This tutorial was created using Excel 2003 – AutoFilter as far as I know is available in Excel 2000/XP/2003
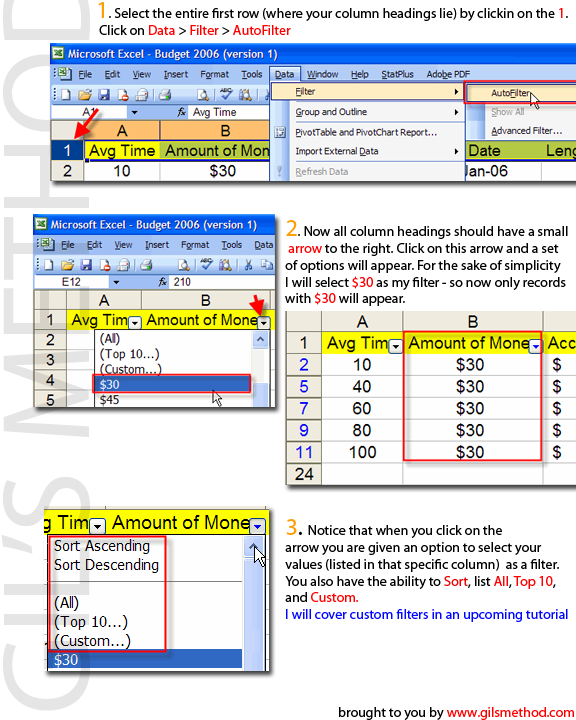
1. Select the entire first row (where your column headings lie) by clicking on the 1.
Click on Data > Filter > AutoFilter
Note: You can also select any cell in your list and apply the filter.
2. Now all column headings should have a small arrow to the right. Click on this arrow and a set of options will appear. For the sake of simplicity I will select $30 as my filter – so now only records with $30 will appear.
3. Notice that when you click on the arrow you are given an option to select your values (listed in that specific column) as a filter. You also have the ability to Sort, list All, Top 10, and Custom.
I will cover custom filters in an upcoming tutorial
