If you’re like me and you have thousands of pictures to go over and little time, the Quick Develop panel available in Lightroom 1 & 2 will make your day easier. While I recommend that you edit your pictures manually to get the most out of them, the Auto Tone and Auto White Balance adjustments in Lightroom 2 have been improved immensely from Lightroom 1 and offer great results a lot of times. Below I will guide you through the features available in the Quick Develop panel and show you how to use it. If you have any questions or comments feel free to post them below.
Note: I used Lightroom 2 for this tutorial, some of the features discussed below are not available in Lightroom 1
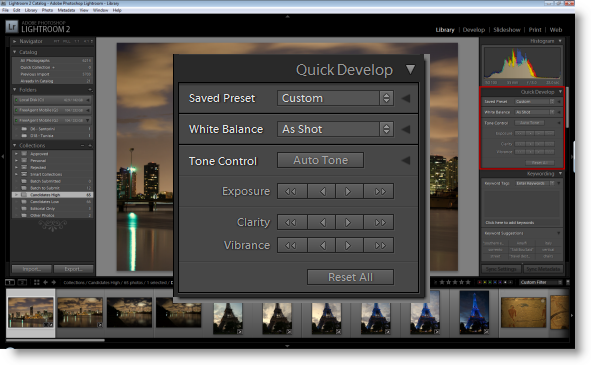
1. The Quick Develop panel is located on the panels to the right, underneath the Histogram Panel.
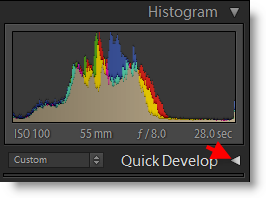
Note: If the panel is not displayed, just click on the arrow to the right of the words Quick Develop and it will expand.
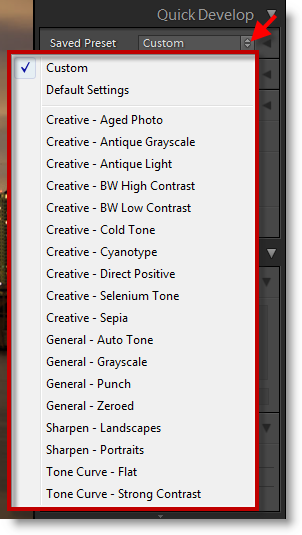
2. If you’re interested in quickly developing the picture you can use one of the default presets by clicking on the Saved Preset drop-down (the default selected is Custom). Here you can chose to develop the photograph using presets like; Sepia, Aged Photo, Antique Grayscale, and many more. In this tutorial we’ll focus on the Custom preset, for now leave it set at Custom.
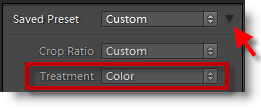
Note: You can also change the picture from color to grayscale and vice versa by clicking on the arrow to the right of the Saved Preset drop-down and changing the option for Treatment. We will discuss the Crop Ratio in future tutorials.
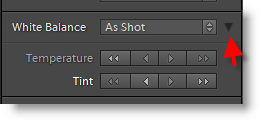
3. Depending on the adjustments you want to make to the photograph you’ve taken, you can start by either adjusting the white balance or adjusting exposure. In order to maintain the order in which the tools are located in this panel, I will cover the next tool beneath the Saved Preset, White Balance. When you click on the White Balance drop-down you are given several options to alter the white balance on your picture, you can maintain the As Shot selection, which will keep the picture with its original white balance setting or you can select one of the options available (Daylight, Auto, Cloudy, and others) this of course depends on the conditions which your original photograph was taken and the adjustments you would like to make.
Note: You can also adjust Temperature and Tint by clicking on the arrow to the right of the White Balance drop-down box.
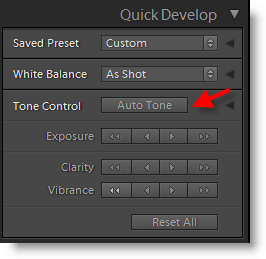
4. If you don’t like the idea of messing around with exposure levels, brightness/contrast, and other settings, you can push the Auto Tone button (located next to Tone Control)which will automatically adjust settings for you. Sometimes you may get the result you’re looking for, other times you may not, this is why Adobe allows you to manually adjust these settings.
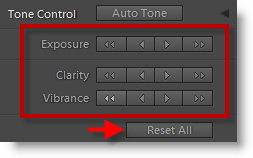
5. The default adjustments available to you are Exposure, Clarity, and Vibrance, if you click on the arrow to the right of the Auto Tone button, Recovery, Fill Light, Blacks, Brightness, and Contrast will be displayed. Each of these adjustments have a set of arrows to their right  . When adjusting Exposure a single arrow represents 1/3 stop more/less depending on the direction of the arrow, a double arrow is for full stop either way. The same concept applies for the other adjustments.
While playing with these adjustments there will come a time when you would like to reset a specific change, you can do so in two ways;
A. To reset a specific adjustment, click on the adjustment name, for example to reset adjustments made to exposure, click on Exposure
B. To reset all adjustments made to a photograph, click on the Reset All button located at the bottom of the Quick Develop panel.
C. You can always select As Shot from the drop-down menus (this will take you back to the original file).
Applying Settings to Multiple Pictures
If you’ve got 100 pictures with similar characteristics, same subject, colors, exposure, etc. You can apply the settings to all at the same time or you can synchronize settings. I’ll explain more below.
Multiple Pictures at a Time
To make adjustments to multiple pictures at the same time, begin by selecting the pictures. You can do this by Ctrl + Left Click (add multiple pictures to a selection) and select the pictures you would like to adjust or you can Shift + Left Click and select multiple pictures from one picture to another (this selects the first picture and all pictures in between your second selection). Once you’ve selected your pictures make adjustments to the items discussed above, Exposure, White Balance, etc. All pictures should now have the same adjustments.
Modify One Picture and Synchronize Settings to Others (Synchronize Settings = Copy Settings)

1. Once you’ve made the necessary adjustments to your picture, select (using the method described above)the pictures you would like to change (apply same settings as adjusted pictures), and click on the Sync Settings button.
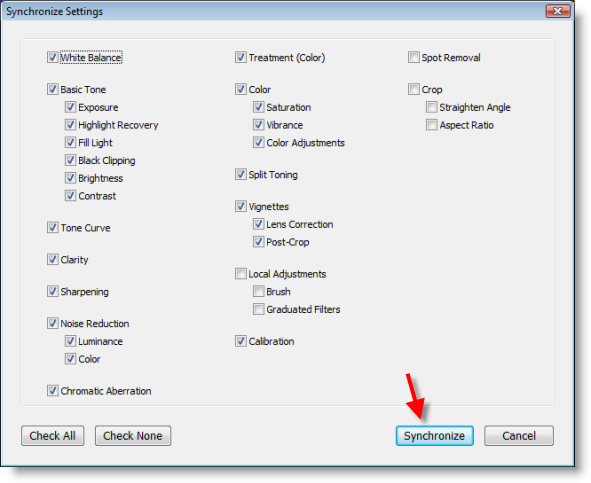
2. You will be prompted to select the settings you wish to Sync, check or uncheck the settings you wish to sync and click Synchronize.
As you can see the Quick Develop panel offers a myriad of options to adjust your photographs, I forewarn you this is only the beginning, there is far more editing capability in the Develop module. We will discuss this and other features in subsequent tutorials.
