Did you know that Windows Live Photo Gallery has the capability to recognize faces from photos stored in your computer? This feature makes it real easy to identify people in your pictures so that they can be found at a later time. This differs from tagging the image with identifiable keywords in that Photo Gallery will automatically find the faces and tag them if they are closely related to a person that has been already tagged.
Once your images are tagged with people’s faces, it will become very easy to locate a person in your massive photo collection. The guide below will show you how to tag faces in Windows Live Photo Gallery and how to search for people that have already been tagged.
Software/Hardware used: Windows Live Photo Gallery running on Windows 7.
Tag Individual Photos and Individuals
Open Windows Live Photo Gallery and double-click to open an image in your library.
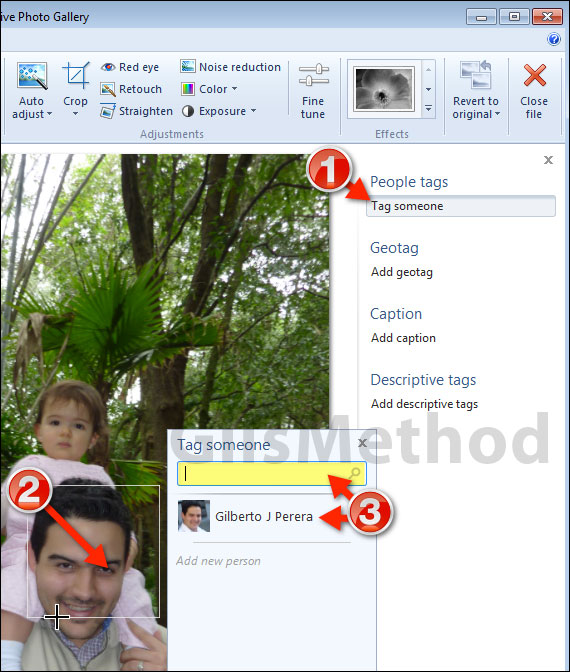
1. When you open an image you should see the tagging pane on the right of the window. Click Tag someone under People tags.
2. Drag a square around the face you wish to tag (this only has to be done when images are new in the library and faces have not been processed by Photo Gallery).
3. A small pop-up will appear asking you to tag the face you selected on the image. You can search for the name if you have a long list or select one of the suggestions listed. Simply click on the name to tag the image.
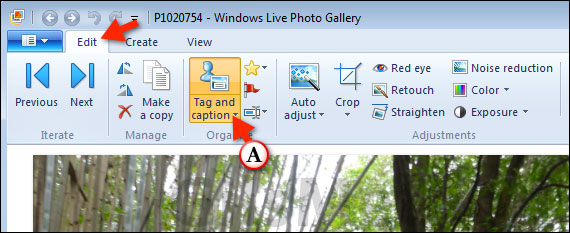
A. If the tagging pane does not appear, click the Edit tab on the Ribbon and then the Tag and caption button in the Organize group.
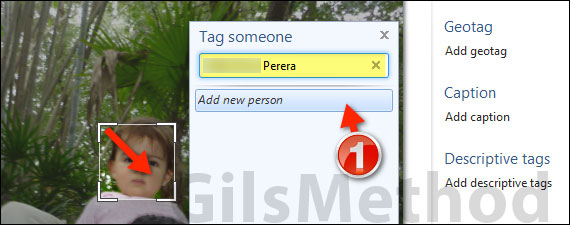
1. To add a new person while tagging images, simply draw a square around the face, enter a name in the Tag someone text box and click Add new person.
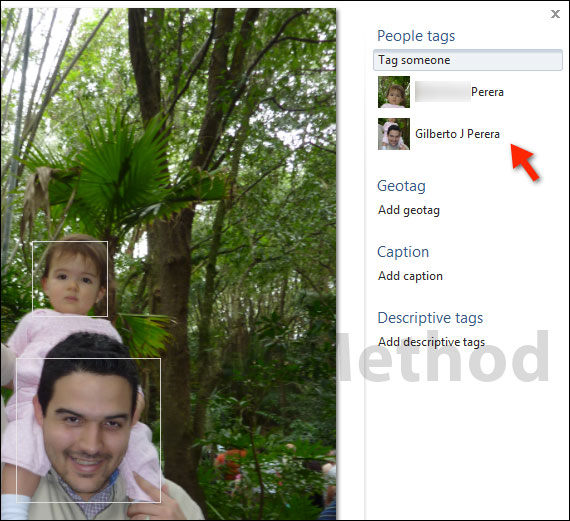
Once the image has been tagged with faces they will appear in the People tags list along with the face associated with that individual.
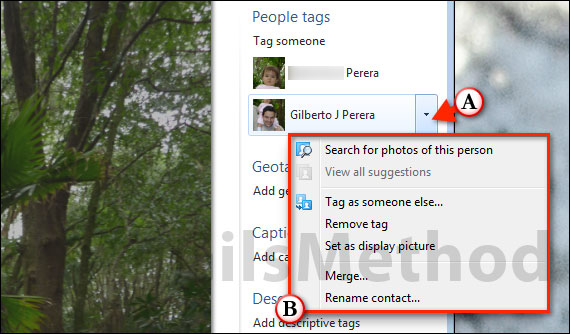
A. If you wish to untag the face or tag the face as someone else click on the name in the People tags list.
B. Here you will be able to perform the following functions:
- Search for photos of this person.
- View all suggestions – Face suggestions based on Photo Gallery’s face recognition.
- Tag as someone else – If you wish to tag the selected person as someone else.
- Remove tag.
- Set as display picture – This is the picture used when referencing the individual tagged.
- Merge – If you wish to merge this contact with another, usually when you have variations of a name for one person.
- Rename Contact – Clean up the name of a specific contact.
Batch People Tag and Save Time
The section above detailed the steps required to tag images individually, this section will show you how to batch people tags so that you can take advantage of Photo Gallery’s face recognition function. The best way to do this is to let Windows Live Photo Gallery run overnight while it scans your images (see below).

These suggestions will make it a lot easier to tag your images. The reason why I suggest leaving it over night is because if you have a lot of images it will take a long time and horsepower to process all of the faces.
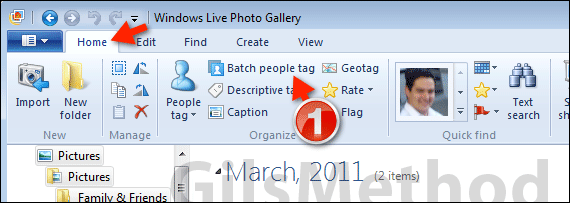
1. Click the Home tab in the Ribbon and click Batch people tag.
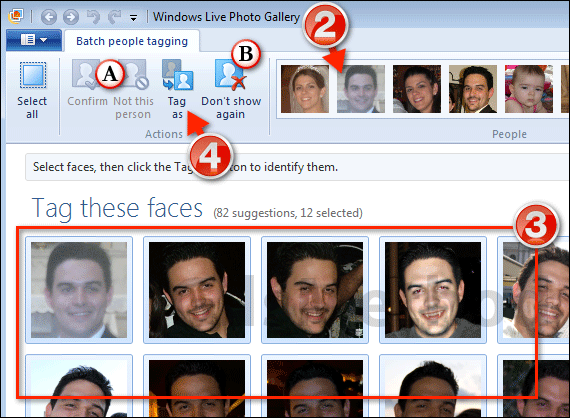
The Batch people tagging tab will appear.
2. Click on the face you wish to tag in the People group on the ribbon.
3. Select the faces you wish to associate with the selected person.
4. Click Tag as.
A. If the selected faces have been associated with an existing profile (saved contact), click Confirm, if the suggestion is incorrect, click Not this person.
B. Also if you have stragglers in your photos or people you don’t know, click the Don’t show again button so they do not appear as a tag suggestion.

5. Click the name from the list and repeat for other images. If the name does not appear on the list, type the name in the search box and click Add new person.
Once you’ve tagged several images, Windows Live Photo Gallery will do a better job of tagging existing images. If you have any comments or questions please use the comments form below.


