If you find that Windows 7 is connecting to other wireless networks instead of your own you may have a problem with the order of preferred wireless networks on your computer. To correct this issue you simply need to tell Windows 7 which network to connect to first. In this guide I will show you just how to do that with Manage Wireless Networks in the Control Panel. If you have any comments or questions please use the comments form at the end of the guide.
Software/Hardware used: Windows 7 Ultimate.

1. Click on the Wireless Network connection on the Task bar.
If the icon is not present, head over to the Control Panel and click Network and Internet and then Network and Sharing Center.

3. When you get to the Network and Sharing Center click the Manage wireless networks link on the left pane.

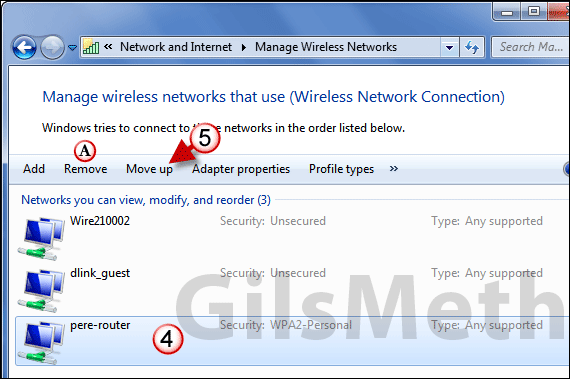
This will open the Manage Wireless Networks window which allows you to manage the wireless networks listed.
4. To set a wireless network as preferred, click to select the wireless network you wish to set as preferred.
5. Click the Move up button until the selected wireless network is at the top of the list. This tells Windows to connect to this network before connecting to others on the list.
A. If you find a wireless network on the list that you no longer wish to connect to, select it and click the Remove button to remove it from the list.
Have any questions or comments, please use the comments form below.


