Unless you actively empty the Trash on your Mac, chances are that it is packed full with old files, downloads, and who knows what.
In order to ensure that you are maximizing your hard drive’s storage space, especially if you are using an SSD, I highly recommend that you empty your Mac’s Trash by following the instructions below.

If you find that you are frequently running out of space on your Mac, I recommend that you set up a schedule in iCal to remind you to clean out the Trash on your Mac to ensure that you have enough space for other files.
In the guide below I will show you how to empty the Trash in your Mac.
Empty the Trash from the Bin
Software/Hardware used: Mac OS 10.6.

1. In Mac OS you have two options to empty the Trash. The first option, you can right-click the Trash bin on the dock and click Empty Trash from the menu. This option does not provide you with a way to preview the files you are deleting.
Preview the Trash Before Emptying the Bin
The second option provides you with a glimpse of the files that are going to be deleted because you have to open the Trash bin before you can delete the files.
A. Click the Trash bin icon on the dock to open the Trash folder or select Open from the menu after right-clicking the Trash icon.

If you decided to pursue the route that allows you to preview the files make sure you verify which items you would be deleting if you empty the trash bin. Otherwise proceed to Step 3.
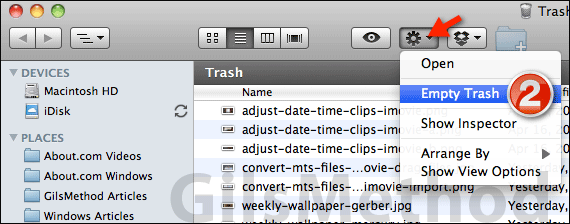
2. Click the Gear icon and click Empty Trash from the menu that appears.

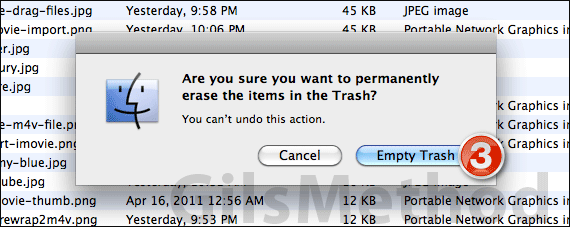
3. You will be asked to confirm the permanent deletion of the files in the Trash. Click Empty Trash to continue.
Warning: You can’t undo this action.
Depending on the size of the Trash it may take anywhere from a couple of seconds to a couple of minutes to delete all the files from the Trash.
If you have any comments or questions please use the comments form below.


