Are you always concerned when a guest asks you to connect to your wireless network? Sure, you can say no, but what does that say about your trust for that person, especially if they are family. To save face and keep your network safe you can enable a common feature in new routers called guest zones. Guest Zones, as it is referred to by D-Link, gives routers the capability of running two wireless networks that are completely isolated from each other, but that can share the internet connection.
I use a guest zone at home to keep guests from having access to my personal files on my home server. You can do the same to prevent unwanted access to your computers, files, and information from nosy guests. To enable this feature on D-Link routers, please follow the instructions below.
I will be posting more articles with other manufacturers as I get my hands on the devices. If you have any comments or questions please use the comments form at the end of the guide.
Software/Hardware used: D-Link DIR-655 Wireless Router Hardware Version A4 with firmware 1.34NA.

1. Open your browser and go to http://192.168.0.1
Note: This address is the default IP address used to communicate with the router’s web GUI, if you changed the router’s address during configuration, please use the new address instead.
Enter your router’s credentials and click Log In.

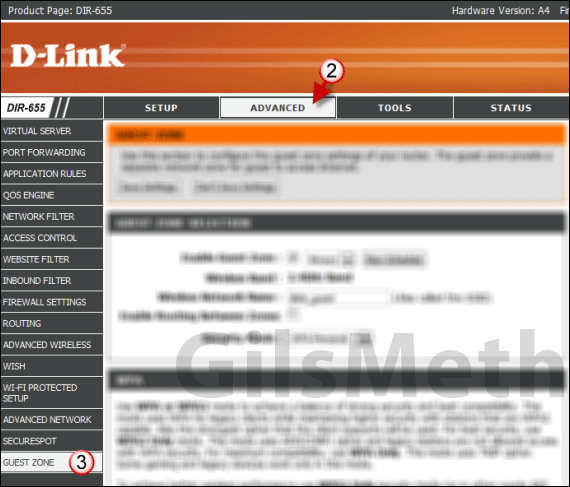
2. Once you are logged in, click Advanced from the top menu.
3. The menu on the left will refresh, click Guest Zone when it appears.
The Guest Zone page has several sections which we will go over in detail below. Read the information so that you can configure the guest network correctly.

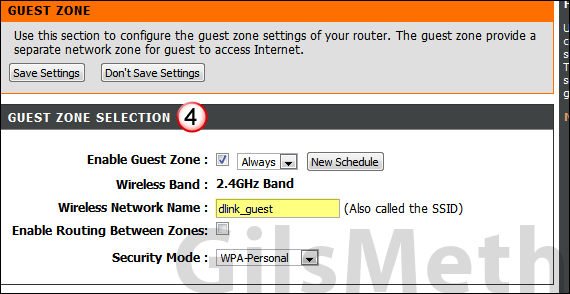
4. Guest Zone Selection
Check Enable Guest Zone and choose a schedule from the drop-down menu.
The schedule allows you to control when the guest zone is available. I chose Always to keep from having to enable the guest network when someone needs it. You may choose to set one of the pre-defined schedules or to create your own by clicking the New Schedule button.
Wireless Network Name: Once you enable the guest zone you will be able to enter the name you wish to use for this network. This is the name that appears when someone is trying to connect to your network. In my case I chose to name it dlink_guest.
For ultimate security make sure that Enable Routing Between Zones is unchecked.
Security Mode: Use the drop-down to select the security mode you wish to use, I recommend you choose WPA. This guide will continue under the assumption that you chose WPA.

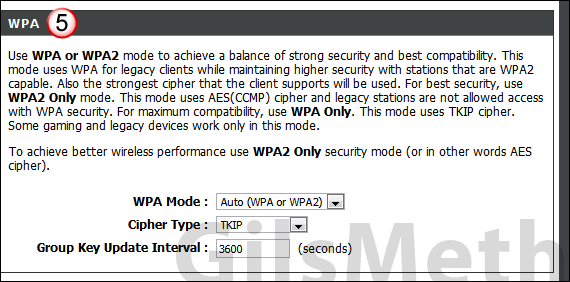
5. If you chose WPA as your security mode for the guest network, the WPA section will become available. Use this section to specify the WPA Mode, the Cipher Type, and Group Key Update Interval.
WPA Mode: The most secure is WPA2, however not all devices are compatible with this encryption method so guests may run into issues connecting to your guest network. If this is the case, I recommend that at least you enable Auto (WPA or WPA2). This will ensure some peace of mind while enabling most of your guests to connect to your guest network.
Cipher Type: If you use Auto for WPA Mode, use the TKIP Cipher which is compatible with legacy systems and some gaming systems. If you choose the WPA2 Mode only, the Cipher will automatically default to AES (CCMP).
Group Key Update Interval: Leave this setting alone.

6. Once you choose the Security Mode and WPA Mode you will be asked to entered the Pre-Shared Key, the password to connect to the guest wireless network. Enter the password you wish to use and make sure that it is alphanumeric and more than 8 characters. The longer the password, the more difficult it is to break.

7. When you are done configuring the guest zone, click Save Settings. The router may require a reboot for the changes to take effect. Once the router reboots you should see the guest zone along with your router’s SSID appear on your wireless networks list.
If you have any comments or questions please use the comments form below.


