If you’re not a fan of Virtual Box and want to become familiar with the easy to use interface in Windows Virtual PC, you’ve come to the right place. In this article along with others I will walk you through the basics of using Windows Virtual PC to create an manage virtual machines on your PC. The how-to below will show you how to create a new virtual machine using Windows Virtual PC.
If you’re new to virtualization or have any questions, please post them below.
Note: I used Windows Virtual PC running on Windows 7 Ultimate Edition.
How to Create a Virtual Machine
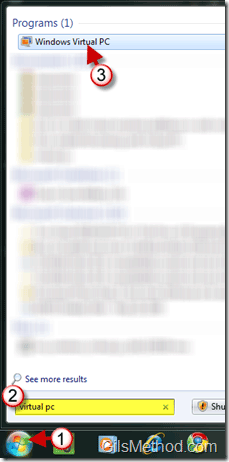
1. Click on the Orb to open the Start Menu.
2. Type virtual pc into the Windows Search box.
3. Click on the Windows Virtual PC shortcut that will appear under Programs in the search results.

4. The Virtual Machines Explorer window will open. Click on Create virtual machine from the toolbar.
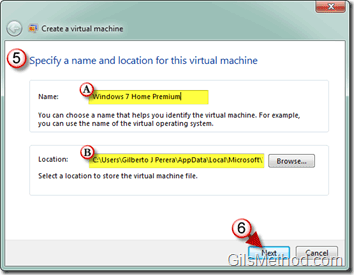
5. The Create virtual machine window will open. Specify a (A) Name for the virtual machine you are creating and choose a (B) Location to store the virtual machine.
6. Click Next when you are done.
7. Specify the amount (A) RAM that you want to allocate for the virtual machine and whether or not the machine will use a (B) Network.
Note: If you choose not to use the computer’s network connections, the virtual machine will not be able to connect to the internet.
8. Click Next when you are done.
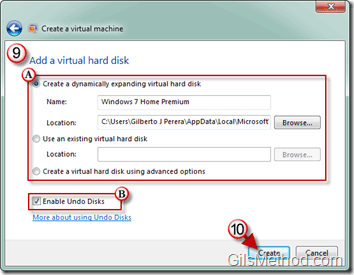
9. Add a virtual hard disk by choosing the (A) type of virtual disk and (B) enabling or disabling Undo Disks.
Note: Information on Undo Disks can be found at the end of this article.
Types of Virtual Disks
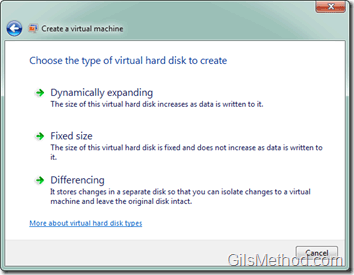
Dynamically Expanding Disks – This type requires a minimum of 8 MB free space on the physical storage media. The size of the disk (and the .vhd file) grows as the disk is used, up to the maximum size specified when the disk was created.
Existing Virtual Disk – If you already have virtual hard disk (.vhd) file you wish to use with this virtual machine, locate and add it to the list.
Advanced Options – Will allow you to select the following disk types:
- Dynamically Expanding – This type requires a minimum of 8 MB free space on the physical storage media. The size of the disk (and the .vhd file) grows as the disk is used, up to the maximum size specified when the disk was created.
- Fixed Size – This type of disk requires as much physical storage space as the size you specify for the disk when you create it. The size of the .vhd file is the same as the virtual hard disk size and remains unchanged.
- Differencing – This type requires a small amount of physical storage when you create the disk, and requires more storage as the size of the disk grows. The maximum size of a differencing disk is restricted by the maximum size of its parent hard disk.
10. Click Create to complete the virtual machine creation process.
The wizard will close and the new virtual machine should appear in the Virtual Machines window.
Undo Disks
Undo Disks is a feature that saves changes to a virtual machine in a separate undo disk file in case you want to reverse the changes. The Undo Disks setting applies to all virtual hard disks attached to the virtual machine.
When you run a virtual machine that is using Undo Disks, any changes to a virtual hard disk are temporarily stored in an undo disk (.vud) file, rather than in the virtual hard disks attached to the virtual machine. As you continue to make changes to a virtual machine, those changes continue to grow in the undo disk. If you decide to either apply or discard the changes stored in an undo disk, that action applies to all changes stored in the undo disk—in other words, you cannot selectively apply or discard changes on an undo disk.
Information about Virtual Hard Disks and Undo Disks from Virtual PC Help Files.


