Although I do just about everything on my computer, there are times that I rely on the analog counterpart. In these cases, pen and paper are great to jot down a couple of ideas so that I can pass them along or save them for later viewing. In order to save ideas I ether take a picture of them with my iPhone and save them on Evernote or I scan them into my computer as a PDF. The latter I accomplish with Adobe Acrobat Pro and an HP All-in-one Scanner/Printer.
The how-to below will show you how to create a PDF document from a scanned document in Acrobat 9.
Note: I used Acrobat 9 for this tutorial.
1. Click on File.
2. Click on Create PDF.
3. Click on From Scanner.
4. Choose the document type. Choose the best one that describes the document/image you are scanning to ensure the best quality.
Scanning document/image.
Depending on the scanner/software you use this may vary.
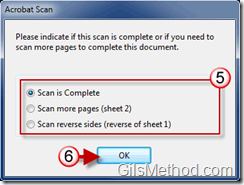
5. If your scan contains more than one page, click on Scan more pages or Scan reverse sides. Otherwise click Scan is complete.
6. Click OK to proceed.
The document should appear in the Acrobat window.
7. To save the document as a PDF, click on File.
8. Click on Save As…
9. Name the file.
a. Click Save.
Now that you can scan PDF files make sure you learn how to search PDF files.
If you have any comments or questions please use the comments form below.


