Now that you’ve picked out a domain and hosting plan for your website the next thing you need to do is actually access the server. In order to access the server you will need to have your user name and password as well as a FTP program to connect to the server. In the guide below I used FileZilla which is a free FTPL client that you can download from the FileZilla website, if you have some cash to spare you can always buy a copy of CuteFTP for about $30. Back to connecting to the server, when you connect to the server space you purchased from the hosting company (managed server) you will have access to the root directory of the server, not the operating system….just the file location that can be made accessible to the internet. If you wish to access the operating system and other functions you will need to purchase a full root access server.
Once you are connected to your server you will be able to upload Content Management Software like WordPress, Drupal, and others or you can simply load HTML files created using an application like Dreamweaver. If this all sounds foreign to you there’s no need to worry. The aim of this series is to help you become familiar with your hosting account, the web, and all webmaster related topics. If you have any comments or questions please use the comments form at the end of the article.
Note: This guide was created with screenshots of FileZilla 3.3.2.
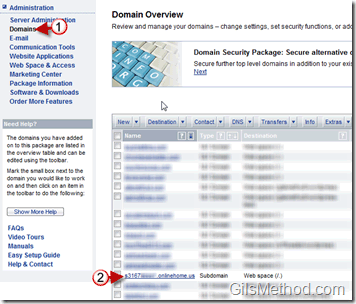
Copy Domain Information
1. Click on Domains in Administration.
2. Take note of the domain information you wish to connect to.
Note: When you use 1and1, the default domain is usually s#####.onlinehome.com, but if you’ve set other domains to connect to the root directory of your server or another location you can use those as well. On this guide I will be using the domain assigned by 1and1.
Connect to Sever Using FTP Client and Create Site Folder
Download and install FileZilla.
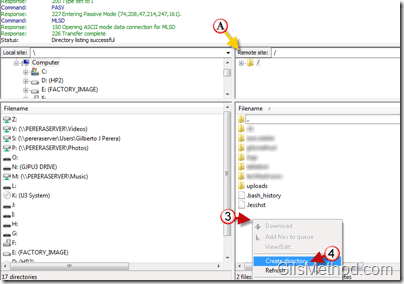
1. Open FileZilla (or your FTP client of choice) and enter your credentials in the Quickconnect bar.
2. Click Quickconnect to begin the connection.
A. Once you are connected to the server, browse to the location where you wish to host your site (make sure you are on the Remote site pane). I usually create a folder for each site at the root level this way I can see at-a-glance what’s running on a particular server.
3. Right click on the blank space to open the menu.
4. Click Create directory from the list.
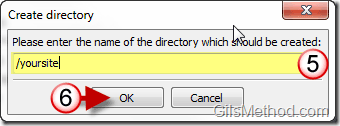
5. When the Create directory dialog box opens, enter a name the for the directory.
6. Click OK to save the changes.
You are one step closer to hosting your own website. If you’re planning on running a WordPress, Joomla, or Drupal installation make sure to setup the MySQL database before proceeding.


