How many times have you encountered someone seeking help over a particular computer error, but the individual had a hard time describing what he or she was doing that caused the error? Thanks to Problem Step Recorder introduced in Windows 7 this is no longer an issue. Problem Step Recorder allows users to automatically capture steps taken on a computer, including text descriptions of where they clicked accompanied with a screenshot for each click. Once steps are captured, they can be saved to a file that can be sent to a tech support person or the local computer person so that the steps leading to the error can be replicated without actually having to be in front of the computer receiving the error.
The guide below will show you how to launch and use the Problem Step Recorder in Windows 7.
Software used: Windows 7 Ultimate edition. Please note, Problem Step Recorder is available in all Windows 7 editions.
How to Record User Interactions with Problem Step Recorder
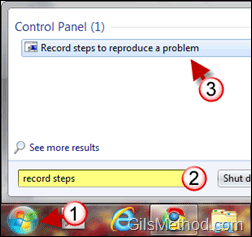
1. Click on the Orb to open the Start Menu.
2. Enter “record steps†in the Windows Search box.
3. Click on Record steps to reproduce a problem in the Control Panel section of the search results.
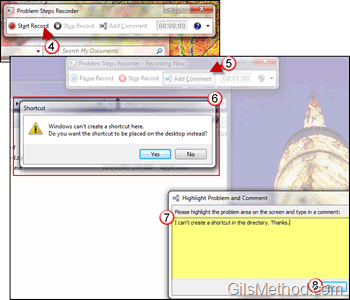
The Problem Steps Recorder application will appear (see below).
4. Click Start Record to begin recording the screen.
Perform the steps that lead you to the error message you wish to report. The Problem step recorder will keep track of your interactions.
5. While recording you can point out specific sections on the screen as well as add comments by clicking on the Add Comment button.
6. Use the cursor to make a selection on the screen. Notice a red bounding box will appear and the background will be semi translucent.
7. Once you have made your selection enter a comment in the Highlight Problem and Comment window.
8. Click OK to save the screen capture and comment.
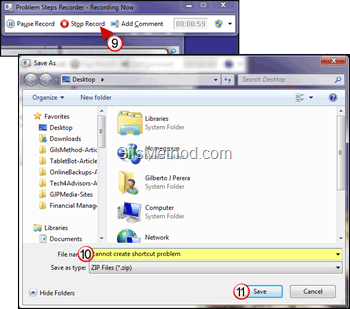
9. When you are done recording and adding comments. Click on the Stop Record button.
10. You will be asked to name the ZIP file containing the recording.
11. Browse to the location you wish to save the file and click Save.
You can attach the saved ZIP file to an email message or share it with someone by copying the file to a location they have access to.


