Have you ever wanted to take screenshots on your Android phone, but dreaded the option to root the phone? There are tons of apps that allow you to take screenshots on your Android device, but they all require that the phone be rooted in order for the app to work correctly. In this guide, I combined several how-to guides to show you how to take screenshots of your Android device without rooting. Most sources link to one article then another, even Google’s documentation on Android isn’t completely up to date hence my putting this off for almost 6 months. Now that I got it all figured out I thought it would be a good idea to write one guide to show you how to set everything up on your computer and Android device. If you have any comments or questions please use the comments form at the end of the article.
A special thanks to the folks at AndroidCentral for putting up some great Android guides and reviews.
Topics covered in this guide:
- Step 1 Meet system requirements
- Step 2 Install Development Platform
- Step 3 Download and Configure Android SDK
- Step 4 Place Your Phone in USB Debugging Mode
- Step 5 Install USB Drivers
- Step 6 Take Some Screenshots
Software/Hardware used: Windows 7 64-bit, Google Nexus One running Android 2.2, Andoid SDK for Windows and Java SE Development Kit.
Step 1 Meet system requirements
Supported Operating Systems
- Windows XP (32-bit), Vista (32- or 64-bit), or Windows 7 (32- or 64-bit)
- Mac OS X 10.5.8 or later (x86 only)
- Linux (tested on Linux Ubuntu Hardy Heron)
- 64-bit distributions must be capable of running 32-bit applications.
Hardware
- At least 500MB of hard drive space in addition to requirements set by the development tools you choose to use.
Step 2 Install Development Platform
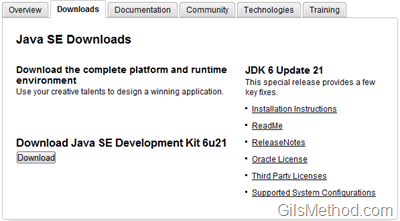
For the purposes of this guide I will stick to the Java development tools, but you also have the option of using Eclipse and others. Download and Install JDK from the Oracle website.
Step 3 Download and Configure Android SDK
Download the Android SDK from the Android website and extract the files to a local directory on your computer.
Note: Make sure to extract the files to a local directory. I made the mistake of extracting to my server share and had issues running the SDK Manager.
Once you have extracted the files you will need to install the USB drivers for the phone so that the tools can speak to your phone.
Step 4 Place Your Phone in USB Debugging Mode
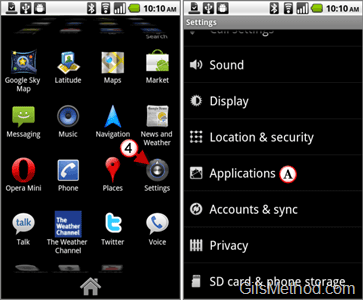
In order to install the USB drivers for the Android phone you will need to place it in Development mode. Follow the instructions below.
4. Tap on Settings.
A. Tap on Applications.
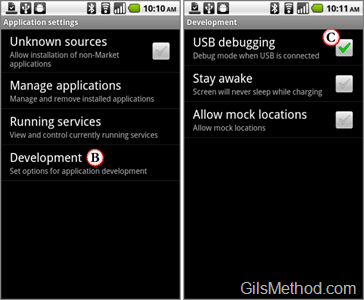
B. Tap on Development.
C. Enable USB debugging by tapping the checkmark.
Step 5 Install USB Drivers
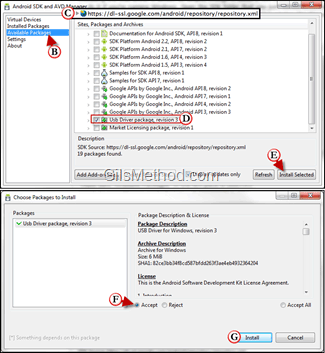
5. Locate the directory where you extracted the Android SDK and double-click on SDK Manager.
Note: A lot of instructions out there refer to SDK Setup.exe, however it appears that the latest version of the SDK the setup.exe has been changed to SDK Manager.
A. Depending on your Windows 7 security settings you may be asked to confirm opening the executable, if this is the case click Run to proceed.
B. When the Android SDK and AVD Manager window opens click on Available Packages on the left pane.
C. A URL pointing to repository.xml should appear on the right. Click on the small arrow next to the URL to expand the list.
D. Scroll down the list and check USB Drive Package Revision #.
Note: The screenshot states revision 3, but I’m sure there will be updates in the near future.
E. When you are ready click Install to begin downloading the package.
H. When the Package is done installing click Close.
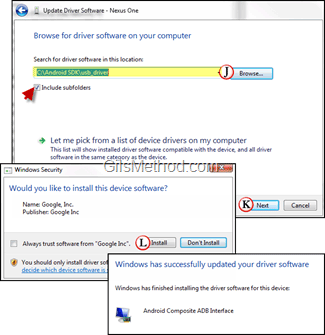
I. When you plug-in your Android device you should be prompted by Windows to select drivers for the device. In this case we don’t Microsoft to go searching for drivers because we already have them. Click on Browse my computer for driver software.
J. Browse to the location where you extracted the SDK package and select the usb_driver folder. Make sure to select Include subfolders.
K. Click Next to proceed.
L. You may be asked to confirm the installation of drivers from Google, click Install to proceed.
When the driver installation is complete you should see a message stating that the installation was successful for the Android Composite ADB interface.
Close the window, unplug the Android device from the computer, and reboot the PC.
Step 6 Take Some Screenshots
I know it feels like we’re running a marathon here, but we’re almost ready to take our first screenshot. Once your computer reboots, plug the Android device and follow the instructions below.
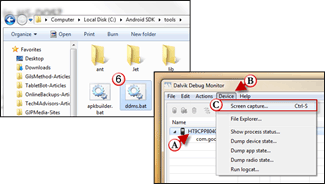
6. Open the tools directory in the Android SDK folder and double-click to open ddms.bat.
This will launch Dalvik Debug Monitor which will allow you to take screenshots of your phone’s screen.
A. Click on the Android device in the Name list.
B. Click on Device on the toolbar.
C. Click on Screen Capture or use [Ctrl] + [S] on your keyboard.
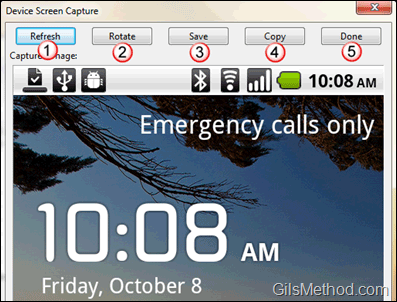
1. Click on Refresh to grab the latest screen on the phone.
2. Use Rotate to rotate the screenshot.
3. Click Save to save the screenshot as a PNG to your computer.
4. If you wish to copy the screenshot to the clipboard to paste it somewhere else click Copy.
5. If you are done using the tool click on the Done button to close the Device Screen Capture window.
Happy image capturing. If you have any comments or questions please use the comments form below.
References AndroidCentral.com & Android SDK Website

