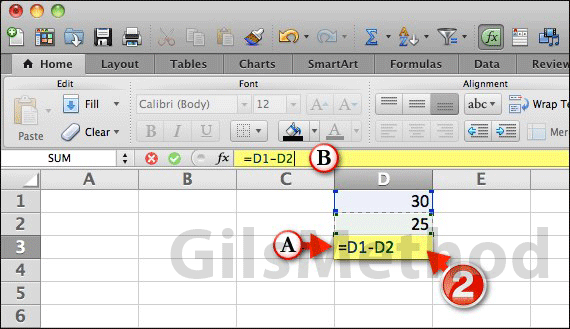
If you are new to Excel and unfamiliar with Excel’s built-in functions, specifically subtraction you will find this guide useful. In the following steps I will show you how to create a formula in Excel that a cell from another to provide you with the difference.
Software/Hardware used: Office 2011 running on Mac OS 10.6, but the guide should apply to all versions of Excel.

1. Click the cell where you would like the difference (the result) to appear.

2. To subtract a number in Excel you will need to write out a formula that reads as follows:
= ‘CELLA’ – ‘CELLB’
Cells A and B refer to a specific cell on the spreadsheet so if the first value you wish to use in the formula is in cell D1 and the second value is in D2 your formula should look like this:
= D1 – D2
It is important that the equals (=) sign precede the cell references (equals sign always goes first when composing a formula) and that you use the minus (–) sign between the two cell references.
There are two places where the formula can be entered.
A. You can enter the formula in the cell where you wish the results to appear, or…
B. With results cell selected you can use the Functions text box to enter the formula you wish to use, in this case the formula described above.
If you prefer to select the cells instead of entering the cell references manually you can start the formula by typing the = sign in the cell or the formula bar and then clicking on the cell containing the first value. After that enter the – sign and click on the cell containing the second value.
When you are done entering the formula, press the Enter/Return key on your keyboard and the difference should appear (see below).

C. The result will appear in the cell containing the formula. You can edit the formula by modifying it on the formula bar or by double-clicking the cell containing the formula and editing it in the cell.


