If you recently purchased an iPad 2 one of the apps you will love most is the Photo Booth app. Originally found as standard app for Macs, Photo Booth allows you to have some with the iPad’s built-in cameras using funky effects. The app is fairly straightforward to use, but I thought it would would be nice to put together a short overview of the app and the functions available for new users.
Software/Hardware used: iPad 2 running iOS 4.3.
How to Take Photo’s with Photo Booth

1. Tap Photo Booth from the iPad’s Home screen.

2. When the app launches you will be presented with a preview of all available effects. Tap the effect you wish to use.

3. After you select the effect, frame the picture you wish to take and tap the Shutter button (small camera) to capture the image.

A. The captured photo will be saved in the cameral roll right above the camera controls.
B. If you wish to change the effect used, tap the Effects icon on the bottom-left of the screen.
C. Your iPad 2 has two cameras and if you wish to switch between them you will need to tap the Switch Camera icon on the bottom-right of the screen.
How to Delete, Email, and Copy Photos in Photo Booth

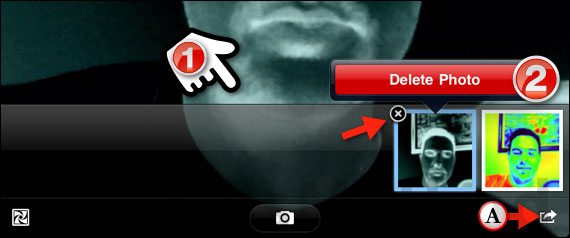
1. Tap the screen to bring up the camera roll.
2. Tap the (x) that appears on the top-left corner of the photos and then tap the Delete Photo button.
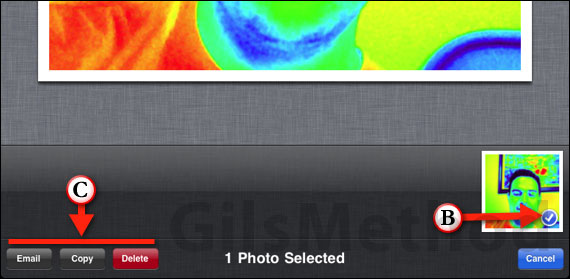
A. If you would like to delete more than one photo at a time or would like to email/copy photos, tap the small arrow icon on the bottom-right of the screen.

B. Tap the photos you wish to select, notice that selected photos will have a small checkmark on the bottom-right.
C. Once you’ve selected the photos tap one of the available functions:
- Email – This option will attach the selected images to an email message.
- Copy – Copies the selected images to the clipboard for use in another application.
- Delete – Deletes the image from the camera roll.
Now that you know how to use Photo Booth, go have some fun and let us know what you think about Photo Booth for the iPad in the comments section below.


