Are you a fan of Word’s reference tool? If you don’t know what I’m referring to then you are missing out on one of the easiest and quickest ways to generate citations that meet APA and MLA formatting standards. So back to those of you that use this awesome tool, wouldn’t it be nice to be able to share your citations with friends or to transfer those citations to a second computer? Word stores the citations or references you create using the Source Manager to an XML file that is located in the App Data folder within your Windows 7 profile. The guide below will show you how to locate these files so that you can copy them to another computer and how to load the .xml file to your Word installation.
If you have any comments or questions, please use the comment form below.
Note: I used Word 2010 on Windows 7 Ultimate for this tutorial.
Locate the Sources File in Windows 7
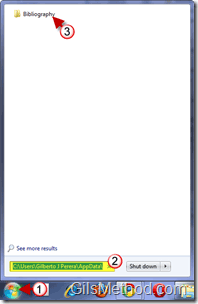
1. Click on the Windows Orb to open the Start Menu and type the following into the [2] Search box:
“C:\Users\[user-name]\AppData\Roaming\Microsoft\Bibliography”
Replace [user-name] with your Windows user name.
3. Click on the Bibliography folder that appears in the Search Results.
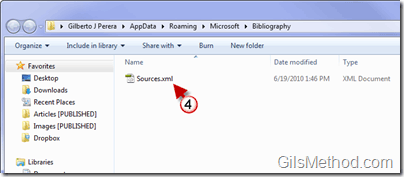
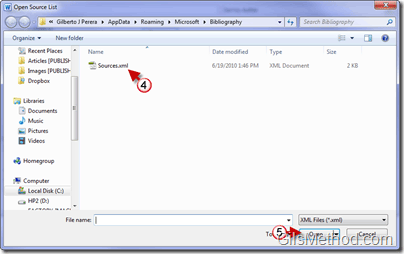
4. The Bibliography folder will open containing the Sources.xml file that you can copy to another computer.
Import References in Word 2007/2010
The following will show you how to import the references your brought from another computer to the Source Manager in Word 2007 and Word 2010.
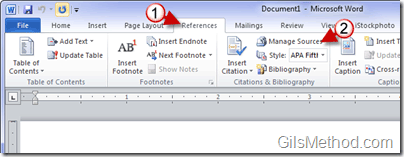
1. With Word open, click on the References tab in the Word Ribbon.
2. Click on the Manage Sources button in the Citations & Bibliography group.
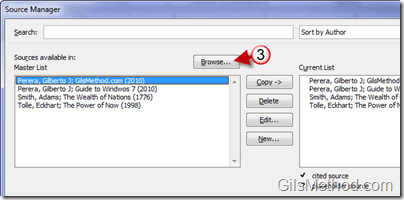
3. When the Source Manager window opens, click on the Browse button.
4. You will automatically be taken to the Bibliography folder, select the .xml file you copied from another computer and click [5] Open.
The sources will now be available in Word.

