In Windows 7, Microsoft introduced the concept of pinning items to the taskbar. When you pin an application or file to the taskbar you are essentially creating a shortcut that is always accessible. This is the reason why Microsoft probably canned the Quick Launch bar as a default taskbar toolbar, however if you’re not a fan of pinning up items and want your Quick Launch toolbar back you can follow the instructions below and get it back. If you have any comments or questions please use the comments form at the end of the article.
Software/Hardware used: Windows 7 Ultimate.
How to Add the Quick Launch Bar

1. Right-click on the Windows Taskbar.
2. Mouse-over Toolbars to expand the menu.
3. Click New toolbar…

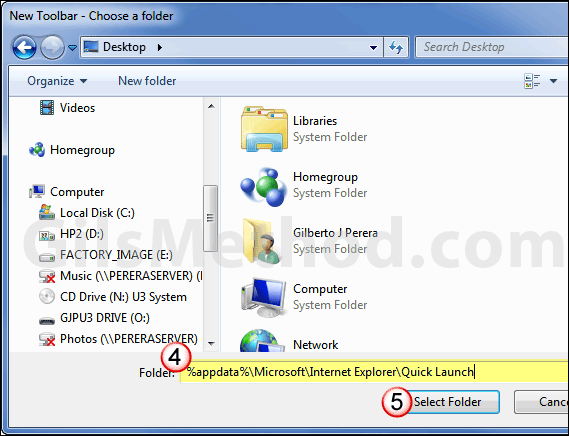
4. When asked to enter a Folder copy and paste the following:
%appdata%\Microsoft\Internet Explorer\Quick Launch
5. Click Select Folder.
Customize the Quick Launch Bar
When the Quick Launch bar appears you will notice that it looks nothing like it did in Vista and XP. The following instructions will show you how to get it back to it’s original location and look.

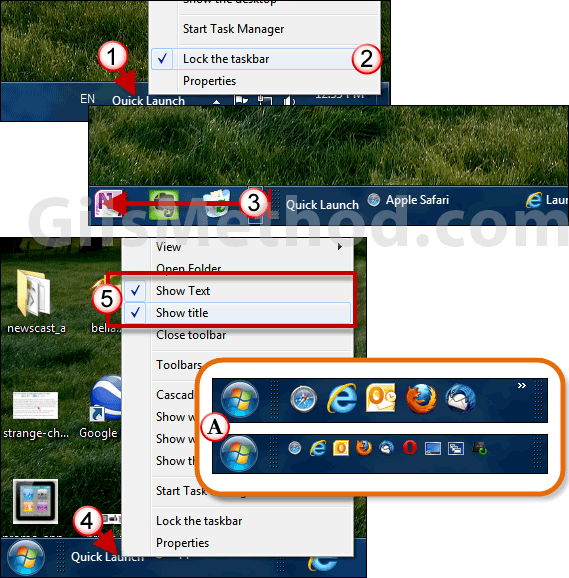
1. Right-click on the Quick Launch.
2. Click Lock the taskbar to unlock the taskbar (make sure it is unchecked).
3. Drag the Quick Launch bar to the left of the taskbar, this will automatically relocate pinned items and open applications.
4. Right-click on the Quick Launch bar again.
5. Uncheck Show Text and Show Title.
A. The default view for the Quick Launch icons is small, however you can change it to Large by right-clicking on the Quick Launch bar, mouse-over View and select Large Icons. This is where resizing the Taskbar makes sense.
When you are done, right-click on the taskbar and click on Lock the taskbar. Questions or concerns, please post them below.
Via Microsoft.


