Do you hate jumping through folders on a server to find a file you frequently work on? Sure you can create a shortcut to the file on your desktop, but that would only work with several files otherwise your desktop will end up like a mess. If you work with a ton of files that reside on a server somewhere you can skip the jumping through directories by mapping your favorite locations as network drives.
What does this mean? Rather than going to (>>some-server-in-alaska>that-has-thefiles>i-need-buried-10>levels-down>file-that-is-buried.xls) you can simply go to the Z: drive (the mapped network drive) and find file-that-is-buried.xls along with other files in the same directory right away. In the guide below I will show you how to map a network drive to an existing directory on a server. This guide assumes that you know the network address of the directory you wish to map. If you have any comments or questions please use the comments form at the end of the article.
Software Used: Windows 7 Ultimate mapping to a network folder located on a Windows Home Server.
How to Map a Network Drive
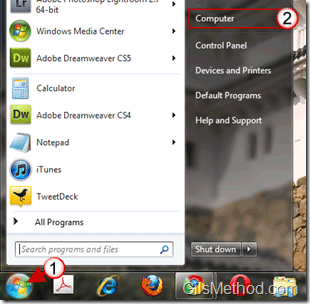
1. Click on the Orb to open the Start Menu.
2. Click on Computer.
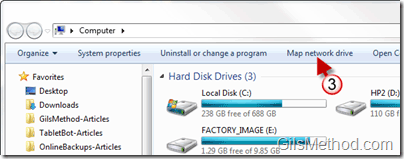
3. When the Computer window opens, click on Map network drive right below the address bar in Windows Explorer.
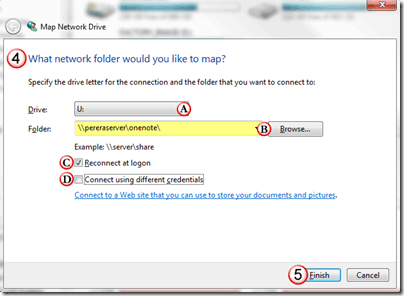
4. Determine what location to map and how.
A. Select the drive letter you wish to designate to the network drive. To avoid conflicts make sure to pick one that is not used by memory card readers and other devices.
B. You have the option of entering the destination folder you will be mapping or you can click on the Browse button to select the directory.
C. If you wish to keep the connection to the network folder even after you reboot, make sure that Reconnect at logon is checked.
D. If the credentials used to gain access to the network resource differ from those used to sign-in to your computer you need to check Connect using different credentials and enter the correct credentials when prompted.
5. When you are done, click Finish to complete the mapping of the network drive.
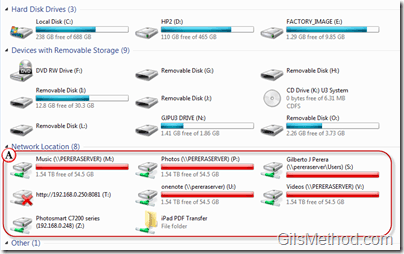
Next time you open Computer you will notice that there will be a section titled Network Location where you will find the network drives you have mapped using the instructions above.
How to Disconnect a Mapped Network Drive
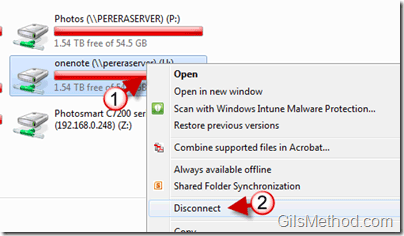
Ok, so you got trigger happy with this great guide, mapped a ton of drives and ran out of drive letters. The two steps below will show you how to disconnect a network drive.
1. Right-click on the network drive you wish to Disconnect.
2. Click on Disconnect from the menu.
If you have any trouble mapping to your network folders or with the instructions above use the comments form below.

