In the previous post we discussed the benefits of using iSCSI to access resources over a network. In this guide we will take the concept of iSCSI a bit further and show you how to get started.
Before you continue with the guide below, download and install the free version of iStorage Server.
Once installed, launch the iStorage application. The iStorage Server Management Console will appear. The console is where you will be able to access all of iStorage Server’s features.
In this guide I will show you how to create a basic iSCSI Target using an image file.
How to Create a New iSCSI Target in iStorage
Click the Create button to start creating iSCSI Target in the Console window.

You will notice that new window will appear with Create iSCSI Target Wizard. The wizard will walk you through the target creation process.
Image Type and Medium Type
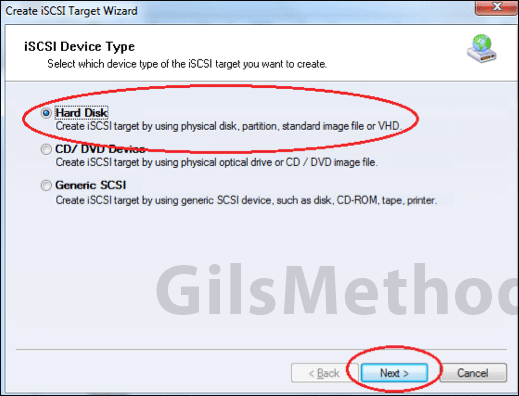
Select Hard Disk from the list and and click Next to proceed.
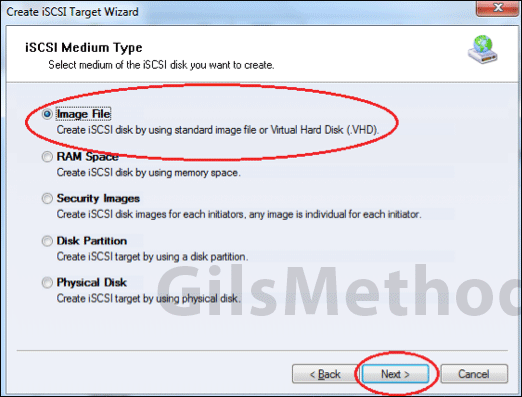
When prompted select Image File from the list and click Next.
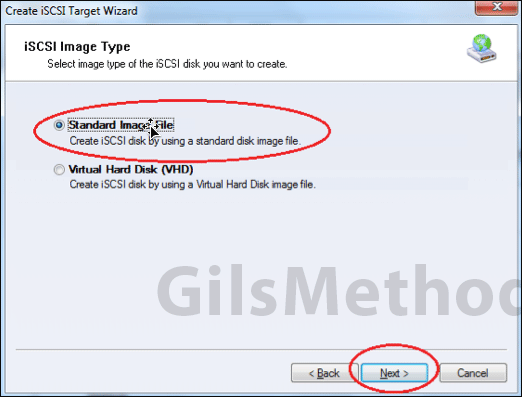
To keep the guide simple, select Standard Image File from the list of options provided and click Next.
Image Disk Configuration
In next step you will have to create a new image file and specify its size.
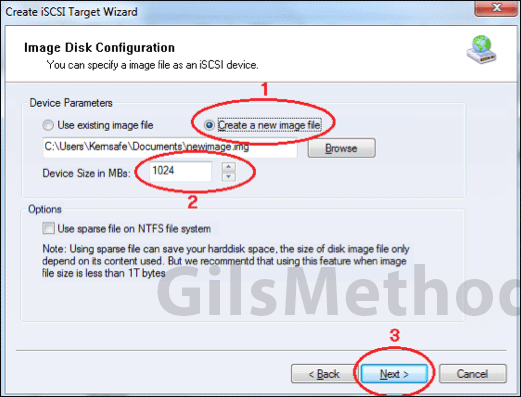
1. To create the image disk, select Create a new image file.
Note: A new window will appear asking you to choose the directory where the image file should be located. Select a location that will be easy to remember.
2. Once you set the image disk location you will need to specify the size of the image. Make sure not to exceed available space on the drive you selected and of course to leave extra space should you need it.
Set the size of the image file in MB, so if you want 1GB, enter 1,024 MB.
Note: You will notice that there’s an additional option which is available to you, Use sparse file on NTFS file system. This is asking you if you would like to create a fixed or auto-expanding image file. The advantage of using an expanding volume is that space is only used when it is needed.
Aside from the obvious benefit, it has one drawback – dynamically expanding files do not offer the same performance as a fixed size set from the beginning.
This option is entirely up to you.
3. Click Next to proceed.
Access Authorization Mode
In this window you may choose the authorization method for your iSCSI Target. I will explain more about it in another article.

For now leave it as Anonymous and click Next to continue.
Complete the iSCSI Target Creation Wizard
In last step of creating iSCSI Target in iStorage Server we need to enter name for the new target.
Note: When you name the target make sure not to use spaces or other special characters.
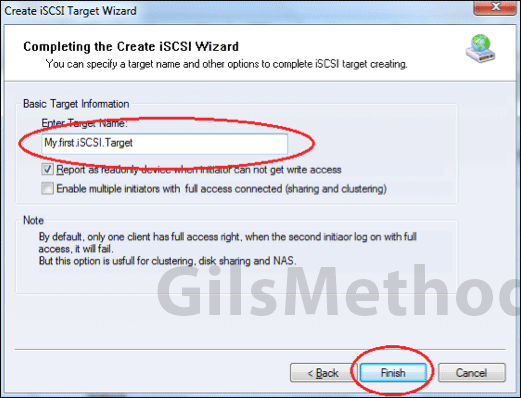
Note: There are two options before you complete the Wizard, but we will cover these in a future article. Leave the default values and continue.
Name the target and click Finish to exit the wizard.
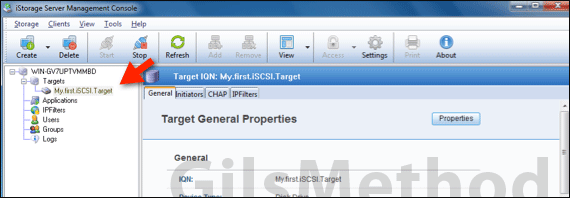
After successfully creating your target, you should be able to see the target listed in the iStorage Server Management Console:
In the next guide I will show you how to find your target’s IP address so that you can connect to it remotely.
If you have any comments or questions please post them below.
KernSafe is global leader in storage virtualization and data security solutions from desktop to the data center. Our costumers vary from individuals, through middle size firms and finishing at big multinational companies. We are dedicated to produce the highest quality software possible and, at the same time, provide the outstanding customer support.
As one of the fastest-growing public software organizations, KernSafe is producing software that is easy to use but can also benefit in professional solutions. You can check KernSafe products offer on our website www.kernsafe.com


