How many times have you plugged in your USB thumb drive to discover that it is using a different drive letter than it had before? This usually occurs because the drive letter used before was probably assigned to another USB thumb drive or storage device attached to your computer. This can be frustrating if you create shortcuts to files or folders stored on thumb drives and then can’t access them because the drive letter has changed, rendering the shortcut useless.
Fortunately Windows 7, like its predecessors allows users to assign specific drive letters to any storage device. The how-to below will walk you through the simple process of assigning drive letters to any drive attached to your computer.
If you have any comments please post them below or if you have any questions visit our forums.
Warning – Please make sure that you are not accessing any files or information on the drive whose drive letter you wish to change, this can result in data loss or corruption.

1. Click on the Orb to open the Start Menu.
2. Right-click on Computer
3. Click on Manage from the menu.
Note: You may get a User Account Control prompt. Click OK/Yes to proceed.

4. When the Computer Management window opens, click on Disk Management located under Storage on the left pane.
5. Right-click on the drive whose letter you want to modify.
6. Click on Change Drive Letter and Paths from the menu.
 ‘
‘
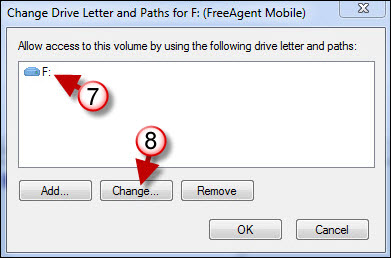
7. Click on the drive letter currently assigned.
8. Click on the Change button.
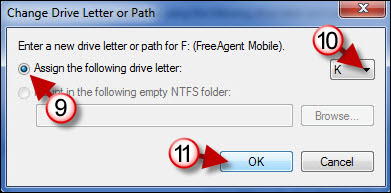
9. The Change Drive Letter or Path window will open. Make sure that Assign the following drive letter is selected.
10. Choose the drive letter you wish to assign from the drop-down menu.
Note: You cannot choose drive letters that are already assigned to another drive. If the drive letter you wish to use is occupied by another device, then you will have to change the drive letter for that drive before proceeding.
11. Click OK to save the changes.
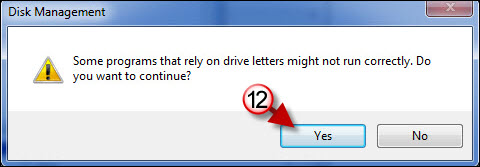
12. Click on Yes to proceed.
Note: This is to make sure you are not accessing or running any applications from the drive whose letter designation you are changing.
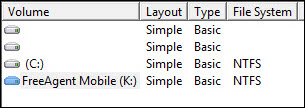
The letter you selected should now be assigned to drive.
