 Vista may have many issues, but we cannot take away the fact that this operating system is bundled with a lot of useful software. Among the number of programs available is Windows DVD Maker, which does exactly what the name implies, it makes DVD’s. The neat thing about this program is the ability to creates slideshows of your favorite photos to play on most DVD players in your home. So imagine, you just came back from a vacation and took hundreds of pictures, now you just pop them into Windows DVD Maker, add a title, pick a menu design, burn, and view them on your TV to share with friends and family.
"Windows DVD Maker, available in Windows Vista Home Premium and Windows Vista Ultimate, enables you to create professional-looking video DVDs of your home movies and photos that can be viewed on your DVD players, regardless of geographical region codes."
One of the neatest features this software has is the menus that you can easily customize to your liking. Below you will find the instructions on how to use the software to make a basic slideshow, if you have any questions regarding the more advanced features, feel free to ask…I’ve had my share of experiences with the software. As always any comments or suggestions are always welcome.
How to below…
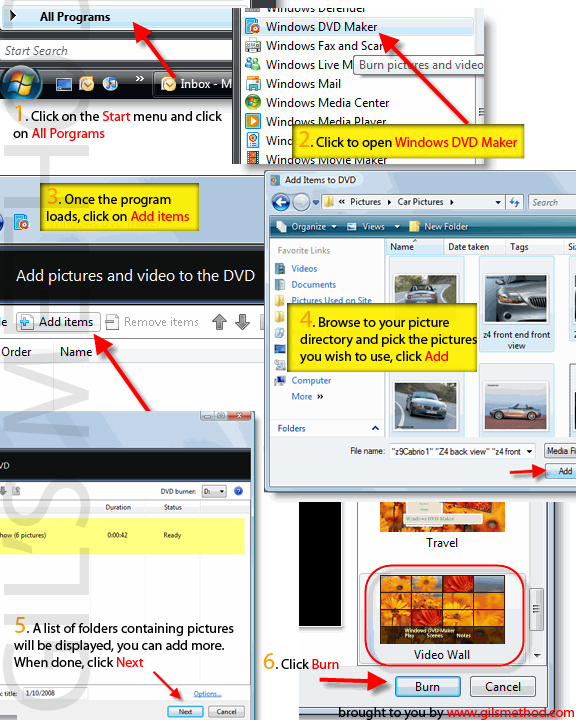
1. Click on the Start menu and click on All Programs
2. Click to open Windows DVD Maker
3. Once the program loads, click on Add items
4. Browse to your picture directory and select the pictures you wish to use, click Add
5. A list of folders containing pictures will be displayed, you can add more. When done, click Next
6. Click Burn
If you wish to view the step-by-step, click the pic tutorial icon below
DVD Maker description via Microsoft.com
