One of coolest features introduced in Windows 7 is the ability to create a virtual folder (in this case a library) that referenced various directories in your computer and network within one folder. Windows 7 ships with four default directories, Documents, Music, Videos, and Pictures. You might say that those four pretty much cover all kinds of content one would store in their computers, but what about eBooks, websites, and other content that contains items from all other directories. Would it be easier to create a library for eBooks rather than navigating through two or three folders before finding the book you are looking for? If you are looking to create your own libraries in Windows 7 and simplify the organization of your digital life, follow the instructions below.
If you have any comments or questions please use the comments form at the end of the article.
Software Used: Windows 7 Ultimate.
Add a Custom Library in Windows 7
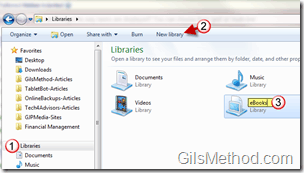
1. When you open Windows Explorer, click on the icon on the left pane.
2. Click on the New Library button on the Explorer bar below the address bar.
3. Name the new library and hit the Enter key. Open the new library.
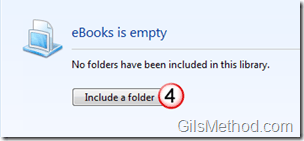
When you open the Library for the first time you will see the message above stating that the library is empty.
4. To add directories to the library click on the Include a folder button.
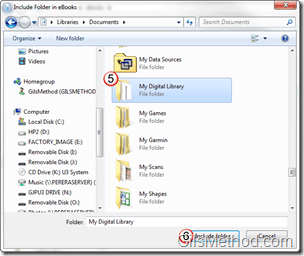
5. A dialog box will open so that you can locate the directory you wish to add to the library. Click on the folder you wish to include.
6. Click the Include folder button.
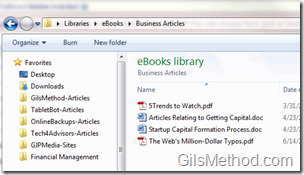
Once the folder has been added to the library you will be able to the folder by opening the new library. If you wish to add other directories to the library follow the instructions below.
Change Library Settings
If you would like to customize the look of the library, add more directories, or change other default settings you will need to dig into the library properties dialog box by following the instructions below.
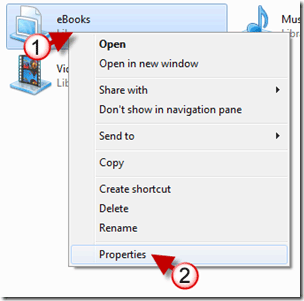
1. Right-click on the library you wish to customize.
2. Click on Properties from the menu.
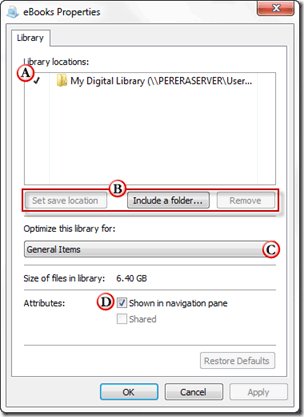
A. This section will list all of the locations that the selected library references.
B. These three buttons help you manage the list of locations.
You can Set save locations for the Library.
You can Include more folders in the Library.
You can Remove folders from the Library.
C. You will also have the option to customize the look of the Library by using one of the pre-defined templates. General Items, Documents, Music, Pictures and Video.
D. You can set Attributes like sharing the library and whether or not to show the library in the navigation pane.
If you have any comments or questions please use the comments form below.

