The other day I finally upgraded my dad’s computer to a more recent model. During the transfer one of the most important items that had to remain intact was Picasa. My father has spent a lot of time organizing, tagging and editing photos in Picasa, the last thing I wanted to do was lose all of that.
If you think copying your pictures folder from one computer to another will solve this issue, you are mistaken. In order for all of Picasa’s information to be transferred correctly you will need to transfer not only the pictures, but also Picasa’s database to the new computer.
In this guide I will show you where that database is located and how to transfer it to a new computer in Windows, this guide assumes you have already transferred the pictures.
Software/Hardware used: Picasa 3.8 running Windows 7 Ultimate.

1. Open Windows Explorer and go to the following directory:
C:> Users > [Your User Name] >AppData > Local > Google
Note: Make sure that you use the user name that is used to store images in Picasa.

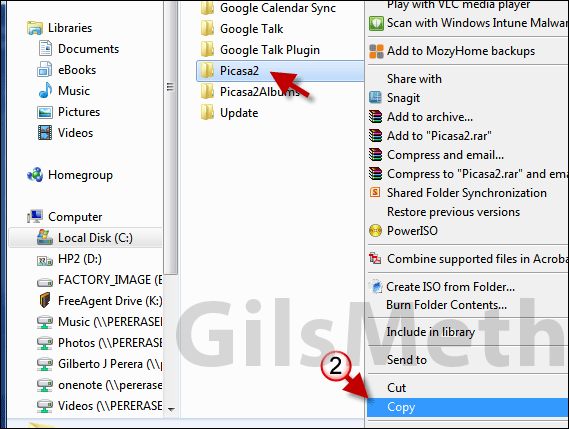
2. Right-click the Picasa2 or Picasa3 folder and click Copy from the menu that appears.
Note: If you’ve been using Picasa since version 2, the Picasa3 folder may appear as Picasa2.
3. Once you have copied the file, open the location (preferably an external or secondary drive) and paste the folder into that location. Once the files have transferred you have successfully backed up Picasa’s database.
When you are ready to restore the database, run Picasa for the first time on the new computer and close the application. Head over to the directory in Step 1 above and overwrite the Picasa2/Picasa3 folder with the backed up copy. Once the files are overwritten, open Picasa and all of your tags and information should appear.
Note: It is important that when you copy the database over that the original images be in the same location otherwise Picasa will not find the pictures.
If you have any comments or questions please use the comments section below.


