Do you have hundreds and thousands of pictures that you are trying to add to Picasa? If so, you are probably receiving an error message stating that your hard drive is full, but you are using an external drive how is this possible? Well, Picasa creates a database on your computer (the C:\ drive) where it stores thumbnails, tags, geo location, and all kinds of information about the pictures it indexes. If you have over 150,000 pictures like the reader that had this problem, you will most likely run into space issues when adding the images to Picasa.
To resolve this issue you have two options, you can upgrade your C:\ drive to a larger drive (which might not be feasible for some) or we can trick Picasa and Windows into thinking that the Picasa database is stored on the C drive when it’s really stored in another location. The second option requires the installation of a small application and following the steps below. I recommend you allot at least 10-15 minutes to complete all of the steps below and that you read through all of th instructions at least once before attempting to complete the steps below.
If you have any comments or questions, please feel free to comment below and I will be more than happy to help you. If you know of an easier way, please post it below.
Before we get started you will need to install the Link Shell Extension application.
Note: I used Picasa 3.6 and Windows 7 Ultimate for this tutorial.
Known Limitations
- Supported platforms are NT4/W2K/WXP/W2K3/W2K8/WXP64/Vista/Vista/Windows7 in 32bit or 64bit.
- Hardlinks can only be made on NTFS volumes, under the supported platforms.
- Hardlinks can only be made within one NTFS volumes, and can not span across NTFS volumes.
- Junctions can not be created on NTFS volumes with NT4.
- The Pick Link Source and Drop … choices are only visible, if it’s possible to create Hardlinks/Junctions/Symbolic Links. E.G.: If you select a file on a FAT drive and press the action button, you wont see the Pick Link Source in the action menu, because FAT file systems, don’t support Hardlinks/Junctions/Symbolic Links. This also happens, if you select source files on a network drive, or select a file as destination, etc.
- There is an OS limit of creating more than 1023 hardlinks per file. This is less known, but it is there.
IMPORTANT Please backup your computer before continuing with this how-to, I installed and used the features without a problem, however it doesn’t hurt to be careful. Use this guide to create a restore point in Windows 7. If you use another operating system, use the search form above to locate the appropriate guide.
Please choose one of the versions below.
32bit – Windows 2000/XP/Server 2003/2008/Vista/7
1. Runtime Dll’s Required for LSE to work – Download (from Microsoft)
2. LSE (Link Shell Extension) – Download (from application author)
64bit – Windows XP-64/Vista-64/7-64
1. Runtime Dll’s Required for LSE to work – Download (from Microsoft)
2. LSE (Link Shell Extension) – Download (from application author)
Once you have downloaded the 32bit or 64 bit files, install the Runtime Dll’s first, then install the LSE application.
Special thanks to LSE’s author – LSE Website.
Note: When LSE installs Explorer may be restarted to enable the context menu links.
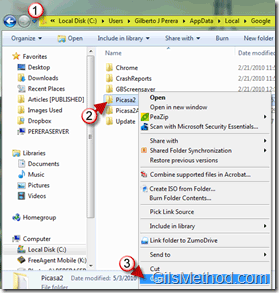
1. Locate your Picasa2 folder by browsing to C:\Local Disk\Users\[your user name]\AppData\Local\Google\
When you get to the Google folder you should see a folder named Picasa2. This is the folder containing all of your Picasa goodies.
2. Right-click on the Picasa2 folder.
3. Click on Copy from the menu.
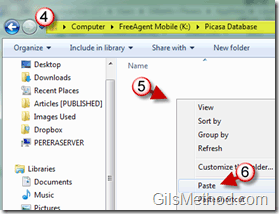
4. Browse to the drive you wish to use for your Picasa database (I’m assuming that this would be a secondary hard drive or an external hard drive attached to your computer).
5. Right-click in the directory.
6. Click on Paste from the menu to paste the Picasa2 folder from your C:\ Drive to the new directory.
Note: Depending on the number of images you have, this could take anywhere from a couple of seconds to a couple of minutes (the database gets bigger as you have more and more pictures).
7. Right-click on the Picasa2 folder you just pasted.
8. Click on Pick Link Source.
Note: If Pick Link Source does not appear, you did not install LSE or the installation was not done correctly. Return to the beginning of the article and make sure you installed the Dll’s and the LSE application.
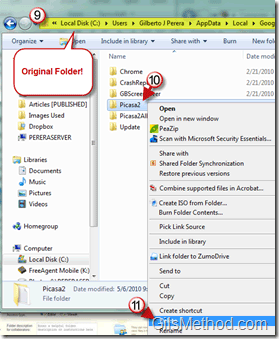
9. Open the Google folder from step 1.
10. Right-click on the Picasa2 folder (the original folder).
11. Click on Delete from the menu.
Note: Don’t worry we created a backup of the folder when we copied it to the other directory in steps 4-6.
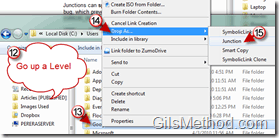
12. Go up a level, in other words you should now be at – C:\Local Disk\Users\[your user name]\AppData\Local\ this is where the Google folder and others are located.
13. Right-click on the Google folder.
14. Click on Drop As.
15. Click on Junction.
Note: If you get a User Account Control prompt, click OK to proceed.
Verifying the Links
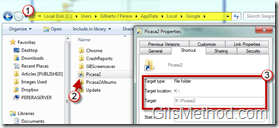
1. If everything went well, open the Google folder and you should find the 2. Picasa2 folder with a small shortcut link. If you open the Picasa2 folder you should see all of the files contained in the Picasa2 folder on your other drive.
I know, I know, Windows Explorer says you are in the C:\ drive when you open the Picasa2 folder, but in fact you are not, remember we are fooling Windows and Picasa into thinking that this shortcut is the real folder.
3. If you open the Properties window for the Picasa2 folder you will notice that the Target is the directory we copied the original files to.
Now for the ultimate test, open Picasa. If all the steps were followed then Picasa should open as if nothing ever happened.
Note: If you are using an external drive, make sure it is plugged in when Picasa opens, otherwise you will get an error that it cannot find the files.

