Don’t you hate it when people send you emails containing a ton of attachments instead of one file? Trust me, they hate it when you do it too. This can happen when sending files related to work or when sending pictures of a recent outing to family and friends. Because there is no option to send a folder as a folder via email, Windows 7 gives users the option of zipping up a group of files or a folder containing multiple files into a compressed zip document. Remember WinZip? Well in Windows 7 you don’t need WinZip to create or open zip files, it is all built-in. Aside from the convenience of sending 1 archive (containing all of your files), zipping or compressing files also reduces the size of the files being sent which in turn reduces the amount of time it takes to send and receive the files.
In this guide I will show you how to create a Zip file in Windows 7 containing multiple files. If you have any comments or questions please use the comments form below.
Note: I used Windows 7 Ultimate for this tutorial.
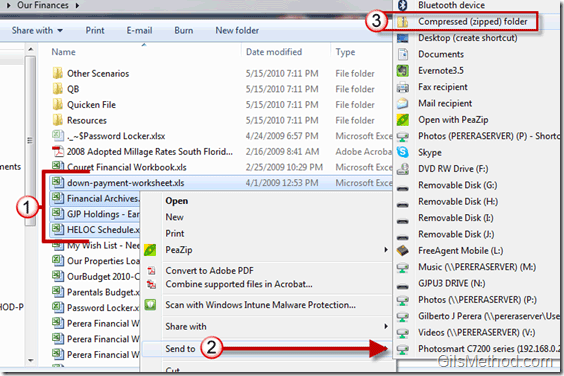
1. Select the files you wish to compress and combine into a Zip file.
2. Right click on the files and click on Send to to open the menu.
3. Click on Compressed (zipped) folder from the list.
A. The zipped file will automatically appear in the folder where the original files reside. The compressed file will take on the name of the file that was first selected when you selected all of the files. If it is a single file, the zip file will take the name of the file with the exception of the extension. The Zip extension is .zip.
When selected, the four Excel spreadsheets are 423KB. After they were compressed to one zip file they only used 109KB, that’s a savings of about 300KB.


